核心目标:提升前端研发效能
创建:标准模板创建、自定义规则创建、创建组件库、自动安装和启动
发布:Git自动化、云构建、项目自动发布、组件自动发布
一、脚手架架构设计和框架搭建
1.1 背景
- 研发架构图
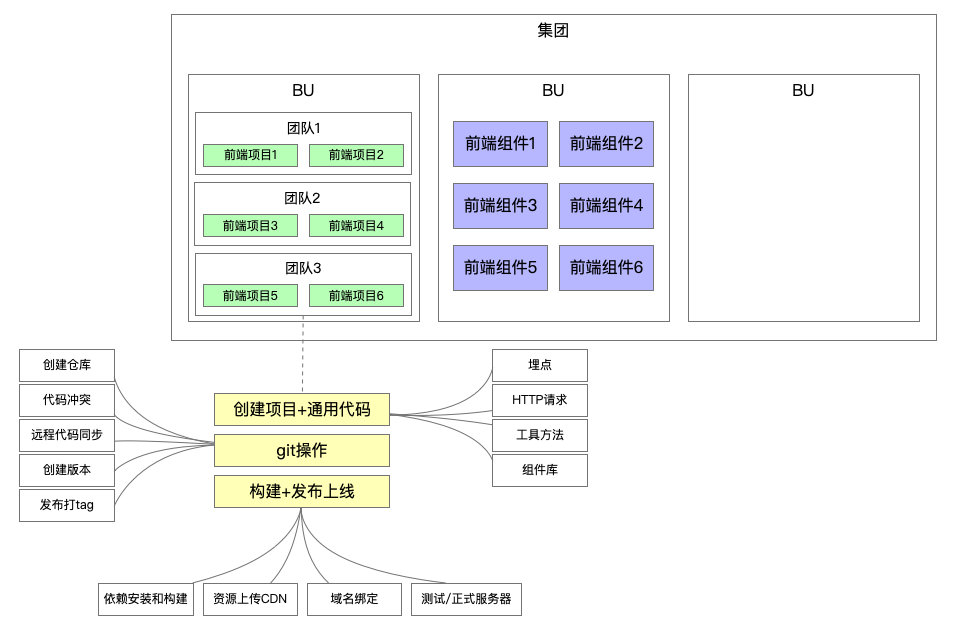
脚手架核心价值
将研发过程:
- 自动化:项目重复代码拷贝/git操作/发布上线操作
- 标准化:项目创建/git flow/发布流程/回滚流程
- 数据化:研发过程系统化、数据化,使得研发过程可量化
问题:jenkins、travis等自动化构建工具已经比较成熟了,为什么还需要自研脚手架?
- 不满足需求:jenkins、travis通常在git hooks中触发,需要在服务端执行,无法覆盖研发人员本地的功能,如:创建项目自动化、本地git操作自动化等
1.2 什么是脚手架
- bash
vue create vue-test-app --force -r https://registry.npm.taobao.org- 主命令:
vue - command:
create - command 的 param:
vue-test-app - 后面的是 option
- 主命令:
1.3 实现原理
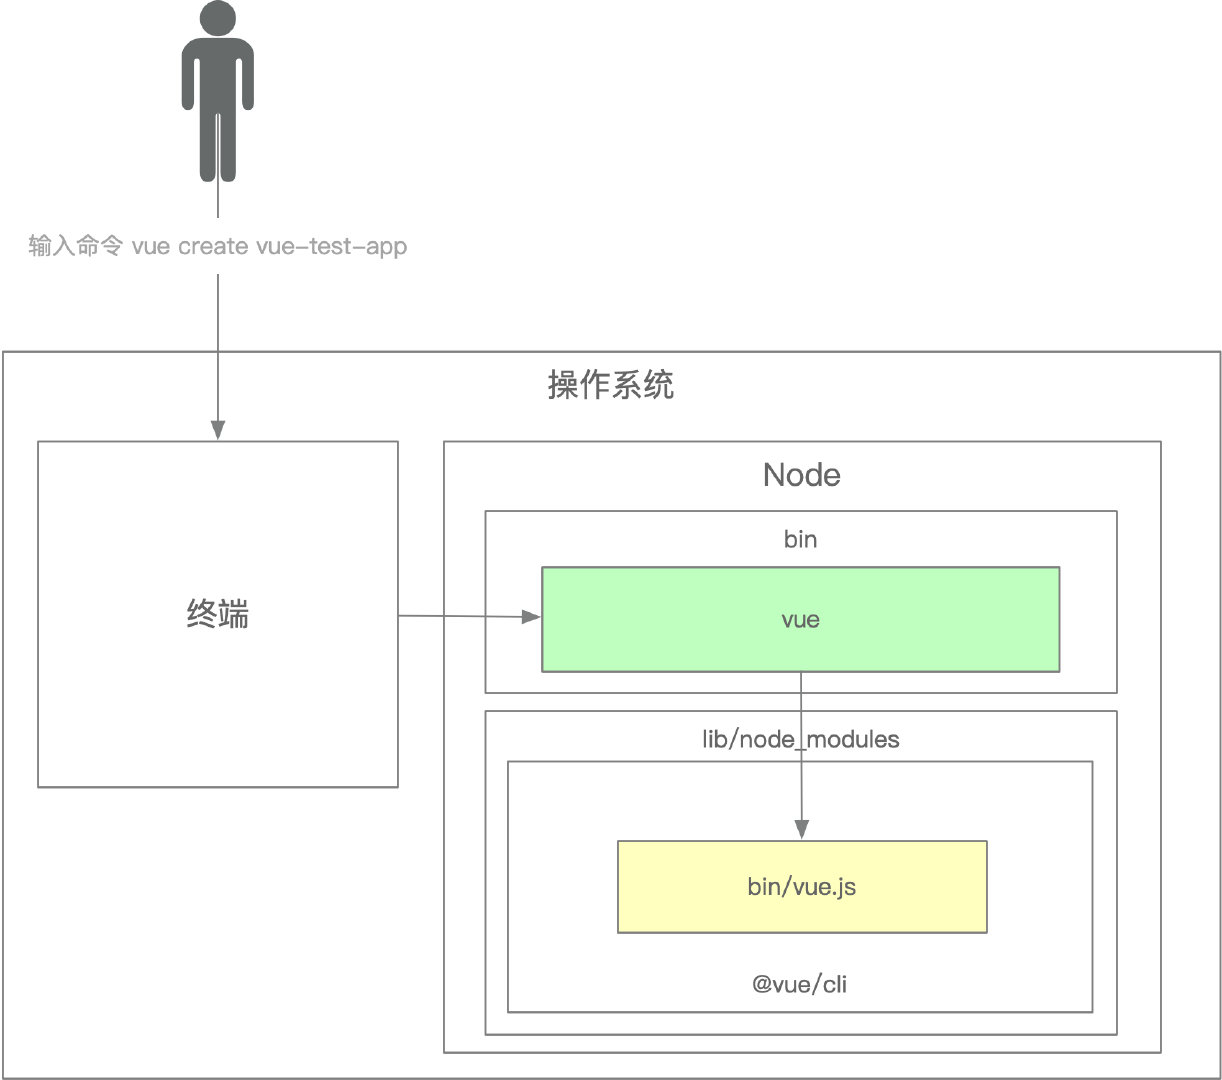
脚手架的执行原理如下:
- 在终端输入
vue create vue-test-app - 终端解析出
vue命令 - 终端在环境变量中找到
vue命令 - 终端根据
vue命令链接到实际文件vue.js - 终端利用
node执行vue.js vue.js解析 command / optionsvue.js执行 command- 执行完毕,退出执行
问题:
为什么全局安装
@vue/cli后会添加的命令为vue?bashnpm install -g @vue/cli因为在cli的package.json中定义了名称
这个配置告诉 npm 在安装包时,创建一个名为 vue 的命令,该命令会执行 bin/vue.js 文件。
json"bin": { "vue": "bin/vue.js" },
全局安装
@vue/cli时发生了什么?- npm 将包下载到全局 node_modules 目录(通常在 /usr/local/lib/node_modules)
- npm 读取包的 package.json 中的 bin 字段。
- 对于每个在 bin 中定义的命令,npm 在系统的 PATH 中创建一个软链接(在 Unix 系统上)或批处理文件(在 Windows 上),指向相应的 JS 文件。
- 这个过程使得我们可以在终端中直接使用 vue 命令。
为什么
vue指向一个js文件,我们却可以直接通过vue命令直接去执行它?- 在 JS 文件的顶部添加 shebang(通常是 #!/usr/bin/env node)。
- 这个 shebang 行告诉系统使用 node 解释器来执行这个文件。
- 在 Unix 系统上,还需要确保文件有执行权限(通常通过 chmod +x 命令设置)。
- 当我们运行 vue 命令时,系统找到软链接,然后执行对应的 JS 文件,使用 Node.js 作为解释器。
为什么说脚手架本质是操作系统的客户端?它和我们在PC上安装的应用/软件有什么区别?
脚手架作为操作系统的客户端
脚手架工具确实可以被视为操作系统的一种特殊客户端,原因如下:
命令行交互:脚手架工具主要通过命令行界面(CLI)与用户交互,而命令行是操作系统提供的一种基本接口。
系统资源访问:脚手架工具需要访问文件系统、网络、环境变量等系统资源,这些都是通过操作系统提供的API实现的。
进程管理:当执行脚手架命令时,操作系统会创建和管理相应的进程。
脚手架与PC应用/软件的区别
虽然脚手架工具和普通PC应用都是在操作系统上运行的软件,但它们有以下几个主要区别:
a. 用户界面:
PC应用:通常有图形用户界面(GUI),更直观易用。
脚手架:主要使用命令行界面(CLI),需要用户熟悉命令。
b. 运行方式:
PC应用:通常是持续运行的程序,有启动和退出过程。
脚手架:通常是短暂运行的命令,执行特定任务后就退出。
c. 功能范围:
PC应用:往往功能丰富,覆盖面广,可以满足各种用户需求。
脚手架:通常专注于特定的开发任务,如项目初始化、构建、部署等。
d. 安装方式:
PC应用:通常通过安装包或应用商店安装,可能需要管理员权限。
脚手架:通常通过包管理器(如npm、pip)安装,可以是全局或项目级安装。
e. 更新机制:
PC应用:可能有自动更新功能,或需要手动下载新版本。
脚手架:通常通过包管理器命令轻松更新。
f. 目标用户:
PC应用:面向普通用户,强调易用性和用户体验。
脚手架:面向开发者,强调效率和自动化。
g. 系统集成度:
PC应用:可能深度集成到操作系统,如注册文件关联、添加开机启动等。
脚手架:通常集成度较低,主要依赖命令行环境。
如何为
node脚手架命令创建别名?- npm link your-cli-tool ycli
- ln -s $(which your-cli) /usr/local/bin/ycli
描述脚手架命令执行的全过程。
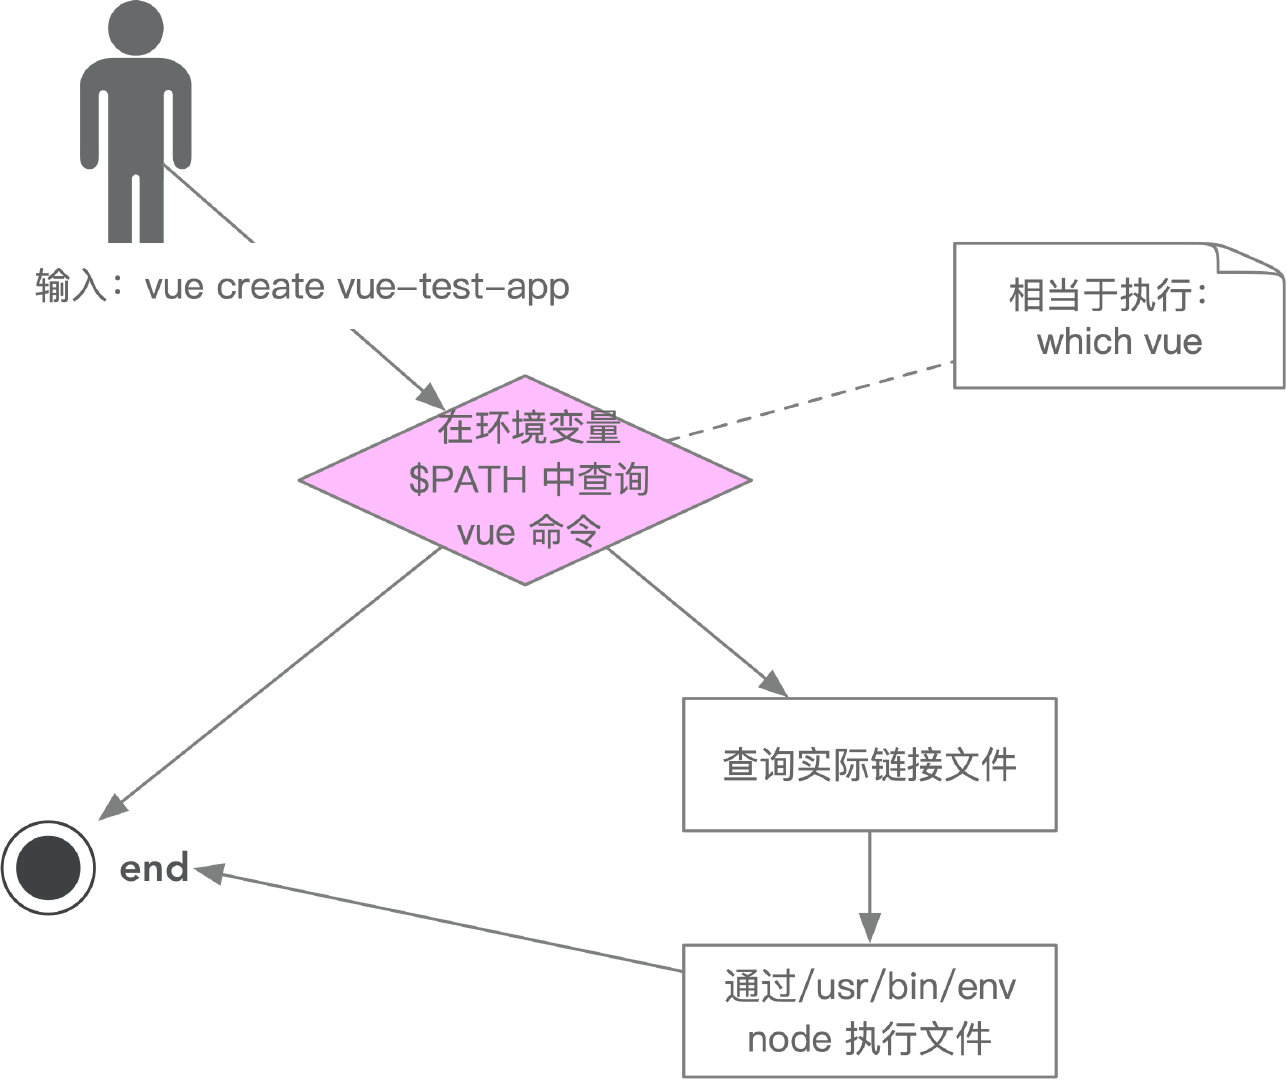
1.4 开发流程
开发流程
- 创建
npm项目 - 创建脚手架入口文件,最上方添加:
bash#!/usr/bin/env node- 配置
package.json,添加bin属性 - 编写脚手架代码
- 将脚手架发布到
npm
- 创建
使用流程
安装脚手架
bashnpm install -g your-own-cli使用脚手架
bashyour-own-cli
难点解析
- 分包:将复杂的系统拆分成若干个模块
- 命令注册:
bashvue create vue add vue invoke- 参数解析:
- options全称:
--version、--help - options简写:
-V、-h - 带params的options:
--path /Users/sam/Desktop/vue-test
- options全称:
示例:
bashvue command [options] <params>- 帮助文档:
- global help
- Usage
- Options
- Commands
- global help
示例:
vue的帮助信息:bashUsage: vue <command> [options] Options: -V, --version output the version number -h, --help output usage information Commands: create [options] <app-name> create a new project powered by vue-cli-service add [options] <plugin> [pluginOptions] install a plugin and invoke its generator in an already created project invoke [options] <plugin> [pluginOptions] invoke the generator of a plugin in an already created project inspect [options] [paths...] inspect the webpack config in a project with vue-cli-service serve [options] [entry] serve a .js or .vue file in development mode with zero config build [options] [entry] build a .js or .vue file in production mode with zero config ui [options] start and open the vue-cli ui init [options] <template> <app-name> generate a project from a remote template (legacy API, requires @vue/cli-init) config [options] [value] inspect and modify the config outdated [options] (experimental) check for outdated vue cli service / plugins upgrade [options] [plugin-name] (experimental) upgrade vue cli service / plugins migrate [options] [plugin-name] (experimental) run migrator for an already-installed cli plugin info print debugging information about your environment Run vue <command> --help for detailed usage of given command.- command help
- Usage
- Options
vue create的帮助信息:bashUsage: create [options] <app-name> create a new project powered by vue-cli-service Options: -p, --preset <presetName> Skip prompts and use saved or remote preset -d, --default Skip prompts and use default preset -i, --inlinePreset <json> Skip prompts and use inline JSON string as preset -m, --packageManager <command> Use specified npm client when installing dependencies -r, --registry <url> Use specified npm registry when installing dependencies (only for npm) -g, --git [message] Force git initialization with initial commit message -n, --no-git Skip git initialization -f, --force Overwrite target directory if it exists --merge Merge target directory if it exists -c, --clone Use git clone when fetching remote preset -x, --proxy <proxyUrl> Use specified proxy when creating project -b, --bare Scaffold project without beginner instructions --skipGetStarted Skip displaying "Get started" instructions -h, --help output usage information还有很多,比如:
- 命令行交互
- 日志打印
- 命令行文字变色
- 网络通信:HTTP/WebSocket
- 文件处理
等等……
本地link标准流程
链接本地脚手架:
bashcd your-cli-dir npm link链接本地库文件:
bashcd your-lib-dir npm link cd your-cli-dir npm link your-lib取消链接本地库文件:
bashcd your-lib-dir npm unlink cd your-cli-dir # link存在 npm unlink your-lib # link不存在 rm -rf node_modules npm install -S your-lib理解
npm link:npm link your-lib:将当前项目中node_modules下指定的库文件链接到node全局node_modules下的库文件npm link:将当前项目链接到node全局node_modules中作为一个库文件,并解析bin配置创建可执行文件
理解
npm unlink:npm unlink:将当前项目从node全局node_modules中移除npm unlink your-lib:将当前项目中的库文件依赖移除
1.5 Lerna
Lerna 是一个优化基于 git+npm 的多 package 项目的管理工具
原生脚手架开发痛点分析
- 痛点一:重复操作
- 多 Package 本地 link
- 多 Package 依赖安装
- 多 Package 单元测试
- 多 Package 代码提交
- 多 Package 代码发布
- 痛点二:版本一致性
- 发布时版本一致性
- 发布后相互依赖版本升级
- 痛点一:重复操作
优势
- 大幅减少重复操作
- 提升操作的标准化
架构优化的主要目标往往以效能为核心。
lerna 开发脚手架流程(
划重点)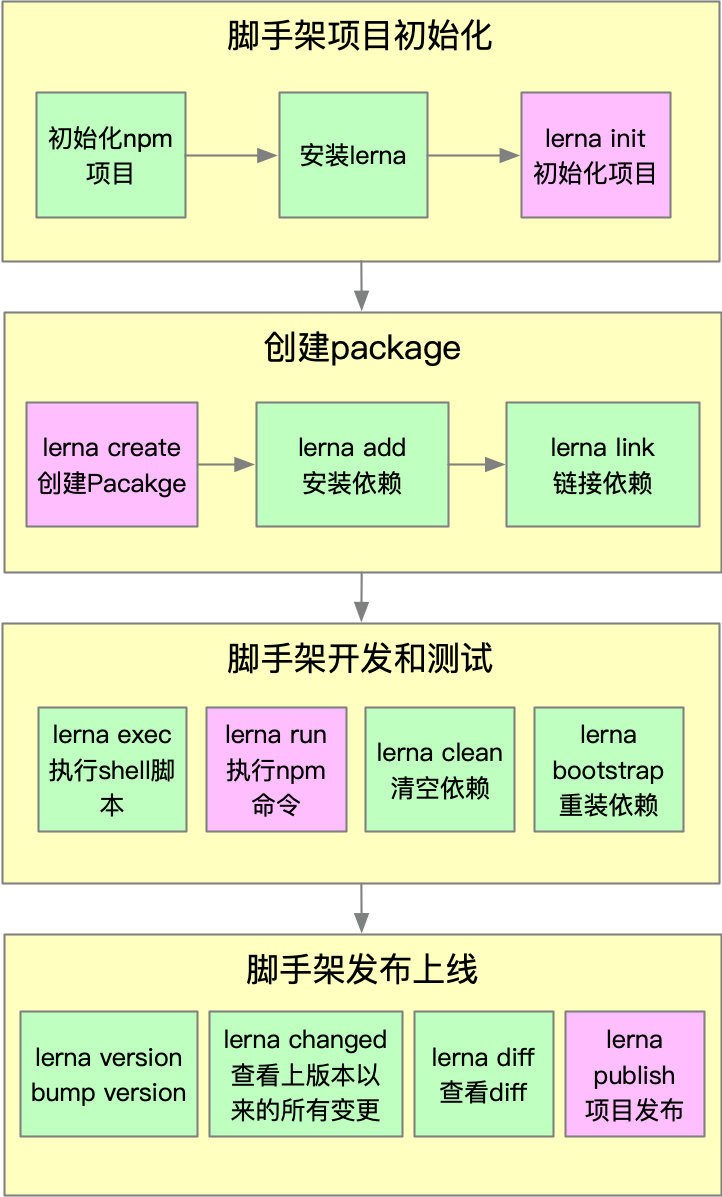
基于 Lerna 创建项目
安装 Lerna
bashnpm install -g lerna创建项目
bashgit init pf-cli-test && cd pf-cli-test初始化 Lerna 项目
bashlerna init创建 Package
bashlerna create @pf-cli/core packages安装依赖
bashlerna add mocha packages/core --dev删除依赖
bashlerna clean安装依赖
bashlerna bootstrap执行单元测试
bashlerna run test执行特定包的单元测试
bashlerna run test @pf-cli-test/corelink 项目
bashlerna link发布项目
bashlerna publishLerna 使用细节(
划重点)lerna init- 会自动完成 git 初始化,但不会创建
.gitignore,这个必须要手动添加,否则会将node_modules目录都上传到 git,如果node_modules已经加入 git stage,可使用:
- 会自动完成 git 初始化,但不会创建
bashgit reset HEAD <file>执行 unstage 操作,如果文件已经被 git 监听到变更,可使用:
bashgit checkout -- <filename>将变更作废,记得在执行操作之前将文件加入
.gitignorelerna add- 第一个参数:添加 npm 包名
- 第二个参数:本地 package 的路径
- 选项:
--dev:将依赖安装到devDependencies,不加时安装到dependencies
bashlerna add <package> [loc] --devlerna link:- 如果未发布上线,需要手动将依赖添加到
package.json再执行lerna link
- 如果未发布上线,需要手动将依赖添加到
lerna clean:- 只会删除
node_modules,不会删除package.json中的依赖
- 只会删除
lerna exec和lerna run:--scope属性后添加的是包名,而不是 package 的路径,这点和lerna add用法不同
lerna publish:- 发布时会自动执行:
git add package-lock.json,所以package-lock.json不要加入.gitignore - 先创建远程仓库,并且同步一次 master 分支
- 执行
lerna publish前先完成npm login - 如果发布的 npm 包名为:
@xxx/yyy的格式,需要先在 npm 注册名为:xxx 的 organization,否则可能会提交不成功 - 发布到 npm group 时默认为 private,所以我们需要手动在
package.json中添加如下配置:
- 发布时会自动执行:
json"publishConfig": { "access": "public" }Yargs脚手架开发框架
- 脚手架构成
- bin:package.json中配置bin属性,npm link 本地安装
- command:命令
- options: 参数(boolean/string/number)
- 文件顶部增加
#!/usr/bin/env node
- 脚手架初始化流程
- 构造函数:Yargs()
- 常用方法
- Yargs.options
- Yargs.option
- Yargs.group
- Yargs.demandCommand
- Yargs.recommendCommands
- Yargs.strict
- Yargs.fail
- Yargs.alias
- Yargs.wrap
- Yargs.epilogue
- 脚手架参数解析方法
- hideBin(process.argv) / Yargs.argv
- Yargs.parse(argv, options)
- 命令注册方法
- Yargs.command(command, describe, builder, handler)
- Yargs.command({ command, describe, builder, handler })
- 脚手架构成
多Package管理工具Lerna的使用方法和实现原理
- Lerna 基于git+npm 的多package项目管理工具
- 实现原理
- 通过import-local优先调用本地lerna命令
- 通过Yargs命令注册时需要传入builder和handler两个方法,builder方法用于注册命令专属的options,handler用来处理命令的业务逻辑
- lerna通过配置npm本地依赖的方式来进行本地开发,具体写法是在package.json的依赖中写入:
file:your-local-module-path,在lerna publish时会自动将该路径替换
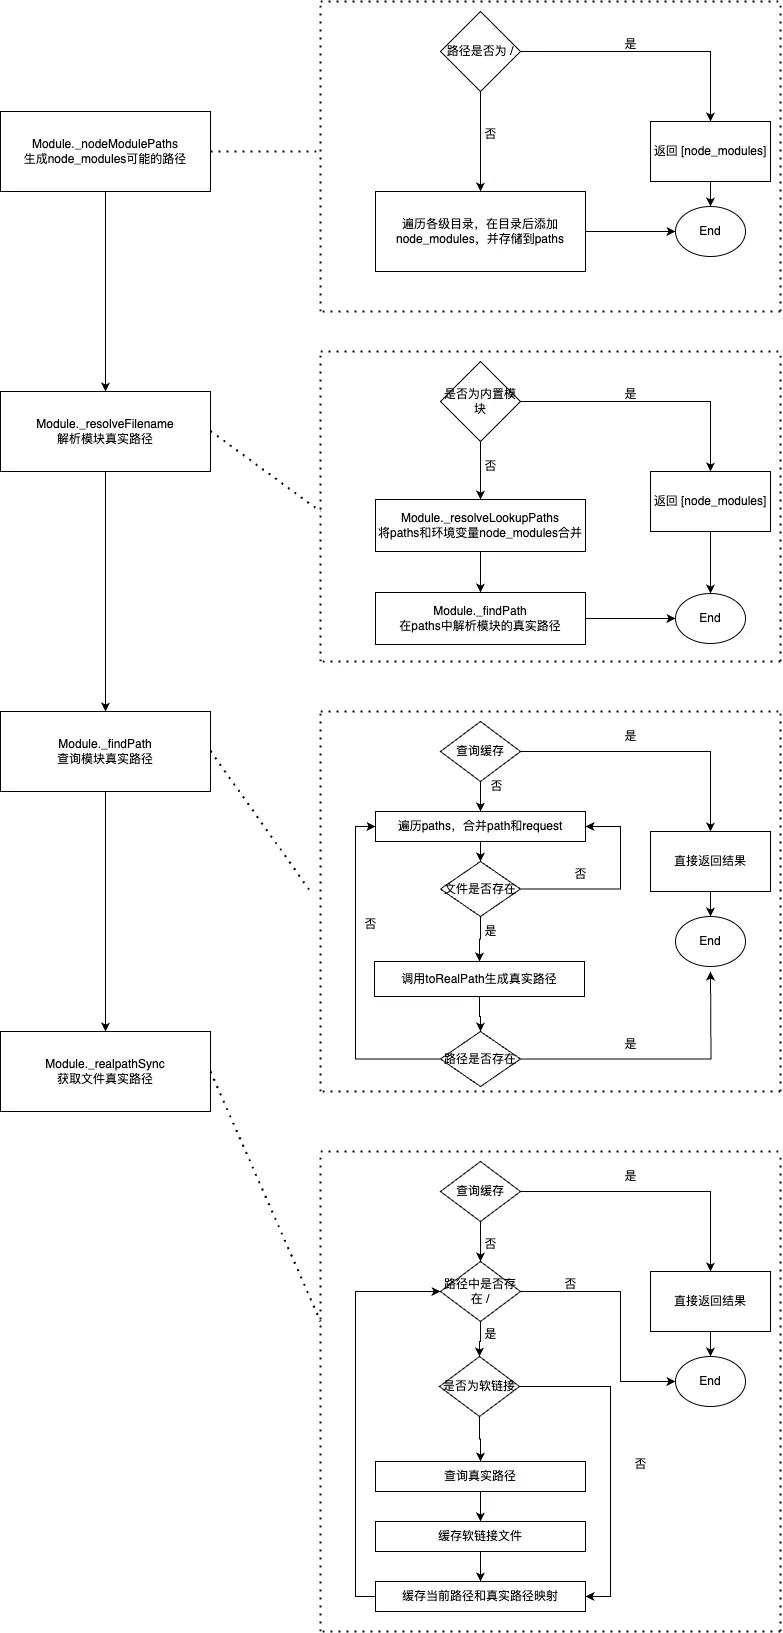
深入理解Node.js模块路径解析流程
- Node.js 项目模块路径解析是通过
require.resolve方法实现的 require.resolve实现原理Module._resolveFileName- 判断是否为内置模块
- 通过
Module._resolveLookupPaths方法生产node_modules可能存在的路径 - 通过
Module._findPath查询模块的真实路径
Module._findPath- 查询缓存(将request和paths通过
\x00合并成cacheKey) - 遍历paths,将path与request组成文件路径basePath
- 如果basePath存在则调用fs.realPathSync 获取文件真实路径
- 将文件真实路径缓存到
Module._pathCache(key就是前面生成的cacheKey)
- 查询缓存(将request和paths通过
fs.realPathSync- 查询缓存(缓存的key为p,即
Module._findPath中生成的文件路径) - 从左到右遍历路径字符串,查询到 / 时,拆分路径,判断该路径是否为软链接,如果是软链接则查询真是链接,并生成新路径p, 然后继续往后遍历
- 遍历完成得到模块对应的真实路径,此时会将原始路径original作为key,真实路径为value,可能存在的路径
- 查询缓存(缓存的key为p,即
require.resolve.paths等价于Module_resolveLookupPaths,该方法用于获取所有node_modules可能存在的路径- 如果路径为 / (根路径),直接返回(
/node_modules) - 否则,将路径字符串从后往前遍历,查询到 / 时,拆分路径,在后面加上node_modules,并传入一个paths数组,直至查询不到 / 后返回paths数组
- 如果路径为 / (根路径),直接返回(
- Node.js 项目模块路径解析是通过
二、脚手架核心流程开发
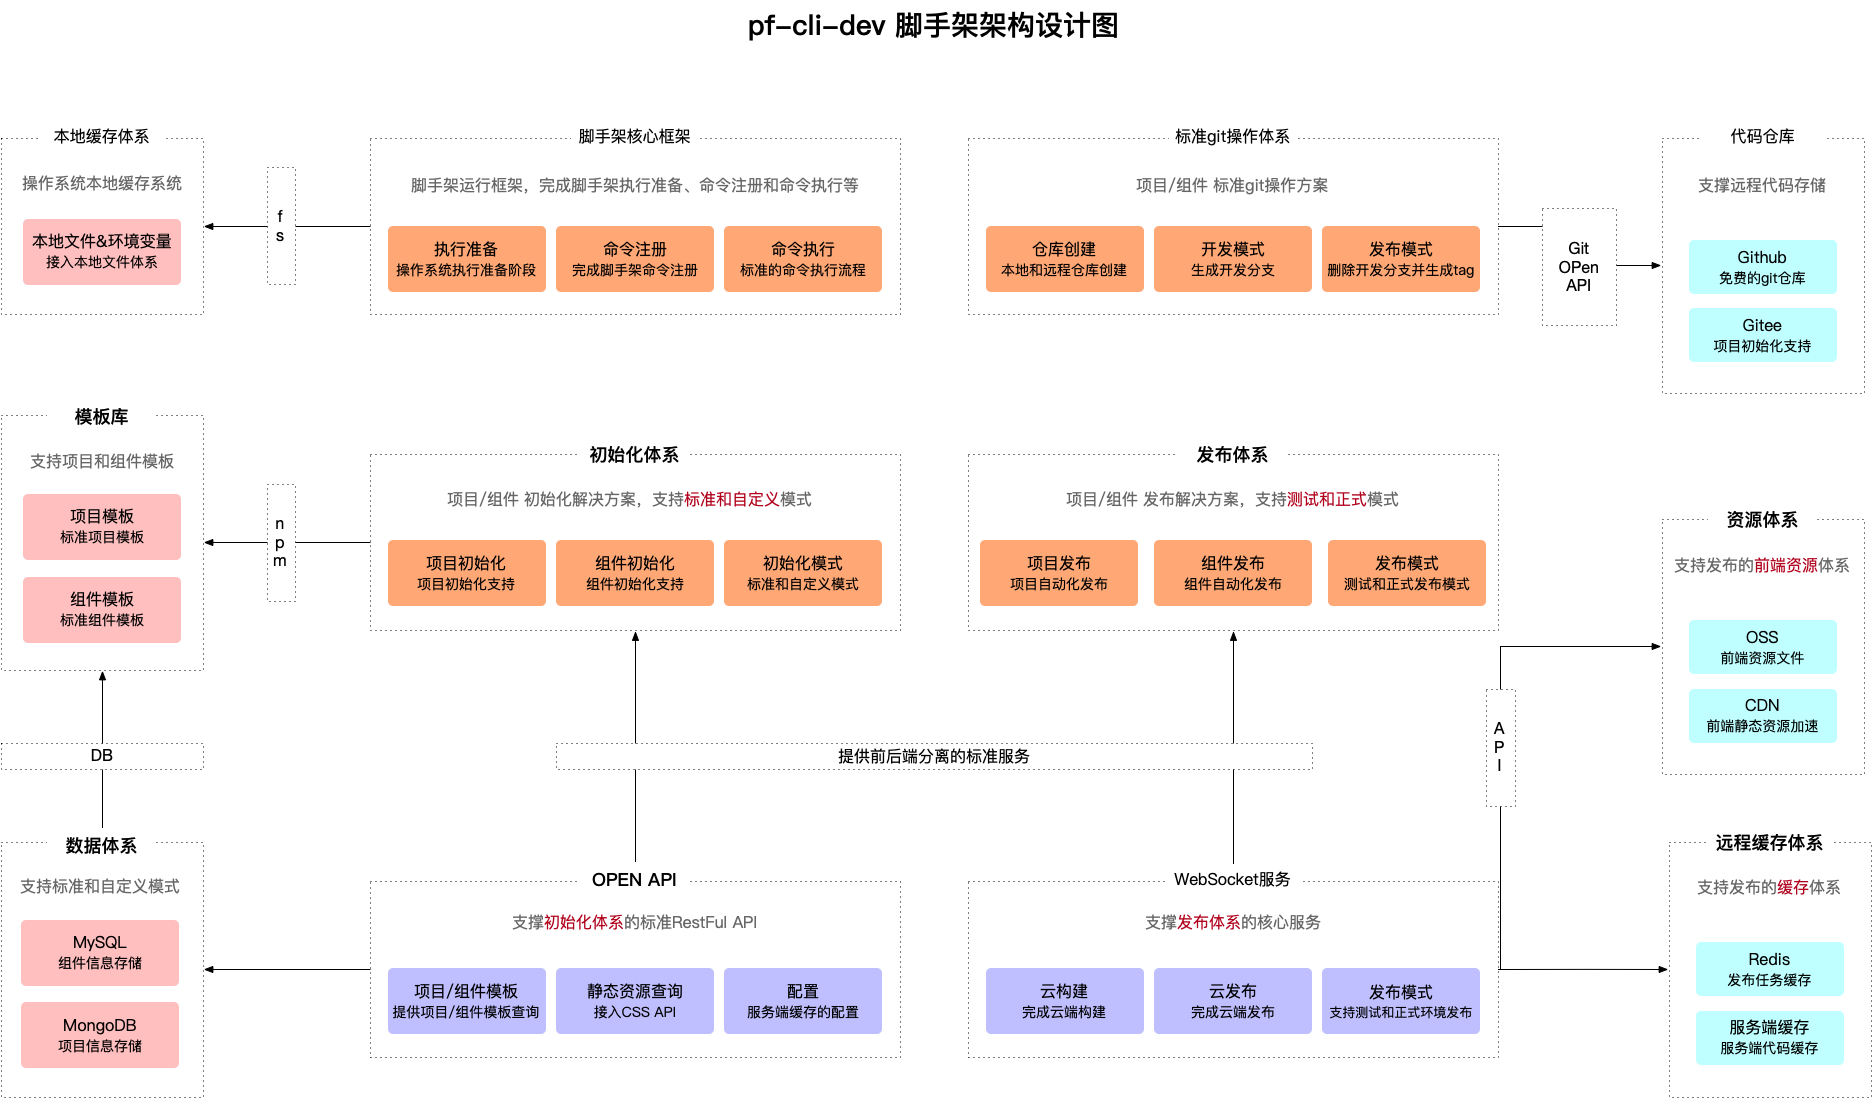
关键架构设计:
- 核心流程
core - 命令
commands- 初始化
- 发布
- 清除缓存
- 模型层
models- Command命令
- Project项目
- Component组件
- Npm模块
- Git仓库
- 支撑模块
utils- Git操作
- 云构建
- 工具方法
- API请求
- Git API
core模块技术方案
核心模块
脚手架
脚手架核心框架
初始化体系
标准git操作体系
发布体系
服务
- OPEN API
- WebSocket
支持体系
- 本地缓存
- 模板库
- 数据体系
- 代码仓库
- 资源体系
- 远程缓存
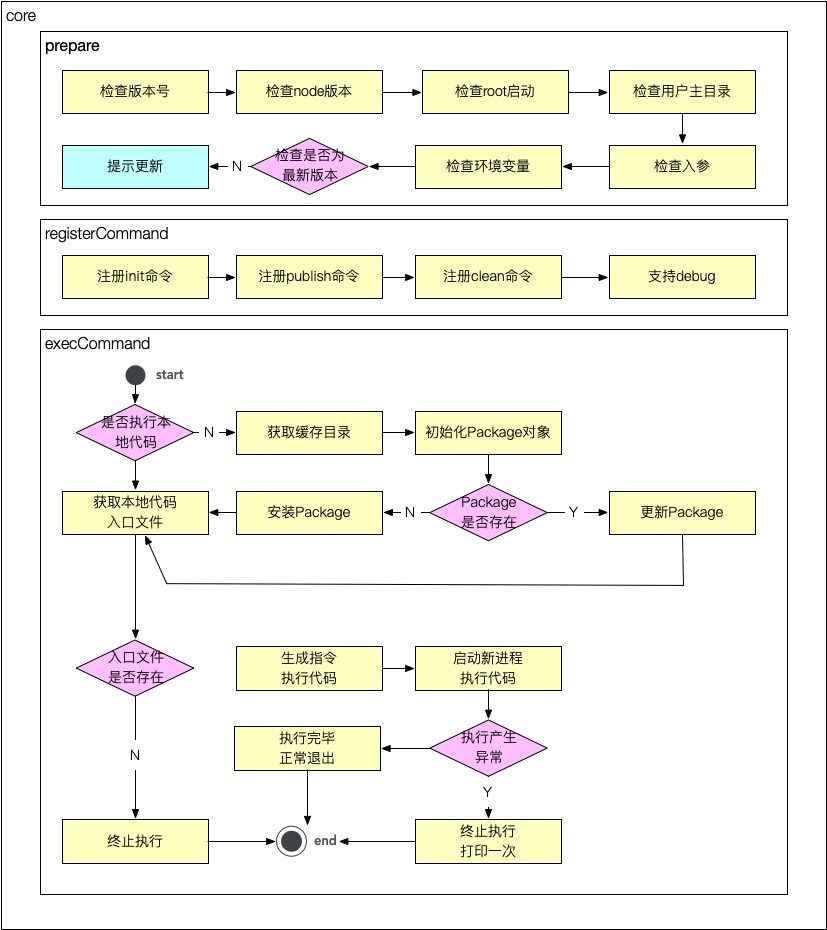
三、脚手架命令注册和执行过程开发
3.1 准备阶段
// core/cli/index.js
async function prepare() {
  checkPackageVersion() // 检查当前运行版本
  checkRoot() // 检查是否为root启动
  checkUserHome() // 检查当前登录用户主目录是否存在
  checkEnv() // 检查环境变量
  await checkGlobalUpdate() // 检查工具是否需要更新
}

function checkEnv() {
  const dotenv = require('dotenv')
  const dotenvPath = path.resolve(userHome, '.env')
  if (pathExists(dotenvPath)) {
    dotenv.config({
      path: dotenvPath
    })
  }
  createDefaultConfig()
}

function createDefaultConfig() {
  const cliConfig = {
    home: userHome
  }
  if (process.env.CLI_HOME) {
    cliConfig['cliHome'] = path.join(userHome, process.env.CLI_HOME)
  } else {
    cliConfig['cliHome'] = path.join(userHome, constant.DEFAULT_CLI_HOME)
  }
  process.env.CLI_HOME_PATH = cliConfig.cliHome
}

function checkUserHome() {
  if (!userHome || !pathExists(userHome)) {
    throw new Error(colors.red('当前登录用户主目录不存在!'))
  }
}

function checkRoot() {
  const rootCheck = require('root-check')
  rootCheck(colors.red('请避免使用 root 账户启动本应用'))
}

function checkPackageVersion() {
  log.notice('cli', pkg.version)
  log.success('欢迎使用pf-cli前端研发脚手架')
}
3.2 命令注册
// core/cli/index.js
function registerCommand() {
  program
    .name(Object.keys(pkg.bin)[0])
    .usage('<command> [options]')
    .version(pkg.version)
    .option('-d, --debug', '是否开启调试模式', false)
    .option('-tp, --targetPath <targetPath>', '是否指定本地调试文件路径', '')

  program
    .command('init [projectName]')
    .option('-f, --force', '是否强制初始化项目')
    .action(exec)

  program
    .command('add [templateName]')
    .option('-f, --force', '是否强制添加代码')
    .action(exec)

  program
    .command('publish')
    .option('--refreshServer', '强制更新远程Git仓库')
    .option('--refreshToken', '强制更新远程仓库token')
    .option('--refreshOwner', '强制更新远程仓库类型')
    .option('--buildCmd <buildCmd>', '构建命令')
    .option('--prod', '是否正式发布')
    .option('--sshUser <sshUser>', '模板服务器用户名')
    .option('--sshIp <sshIp>', '模板服务器IP或域名')
    .option('--sshPath <sshPath>', '模板服务器上传路径')
    .action(exec)

  // 开启debug模式
  program.on('option:debug', function () {
    if (program.debug) {
      process.env.LOG_LEVEL = 'verbose'
    } else {
      process.env.LOG_LEVEL = 'info'
    }
    log.level = process.env.LOG_LEVEL
  })

  // 指定targetPath
  program.on('option:targetPath', function () {
    process.env.CLI_TARGET_PATH = program.targetPath
  })

  // 对未知命令监听
  program.on('command:*', function (obj) {
    const availableCommands = program.commands.map((cmd) => cmd.name())
    console.log(colors.red('未知的命令:' + obj[0]))
    if (availableCommands.length > 0) {
      console.log(colors.red('可用命令:' + availableCommands.join(',')))
    }
  })

  program.parse(process.argv)

  if (program.args && program.args.length < 1) {
    program.outputHelp()
  }
}
3.3 命令执行
// core/exec/index.js
async function exec() {
  // 1. targetPath -> modulePath
  // 2. modulePath -> Package(npm模块)
  // 3. Package.getRootFile(获取入口文件)
  // 4. Package.update / Package.install
  // 封装 -> 复用
  let targetPath = process.env.CLI_TARGET_PATH
  const homePath = process.env.CLI_HOME_PATH
  let storeDir = ''
  let pkg
  log.verbose('targetPath', targetPath)
  log.verbose('homePath', homePath)

  const cmdObj = arguments[arguments.length - 1]
  const cmdName = cmdObj.name()
  const packageName = SETTINGS[cmdName]
  const packageVersion = 'latest'

  if (!targetPath) {
    // 生成缓存路径
    targetPath = path.resolve(homePath, CACHE_DIR)
    storeDir = path.resolve(targetPath, 'node_modules')
    log.verbose('targetPath', targetPath)
    log.verbose('storeDir', storeDir)
    pkg = new Package({
      targetPath,
      storeDir,
      packageName,
      packageVersion
    })
    if (await pkg.exists()) {
      // 更新package
      await pkg.update()
    } else {
      // 安装package
      await pkg.install()
    }
  } else {
    pkg = new Package({
      targetPath,
      packageName,
      packageVersion
    })
  }
  const rootFile = pkg.getRootFilePath()
  console.log(rootFile)
  if (rootFile) {
    require(rootFile).apply(null, arguments)
  }
}
四、 脚手架创建项目流程设计和开发
4.1 脚手架项目创建功能架构设计
思考
- 可扩展:能够快速复用到不同团队,适应不同团队之间的差异
- 低成本:在不改动脚手架源码的情况下,能够新增模板,且新增模板的成本很低
- 高性能:控制存储空间,安装时充分利用 Node 多进程提升安装性能
架构设计图
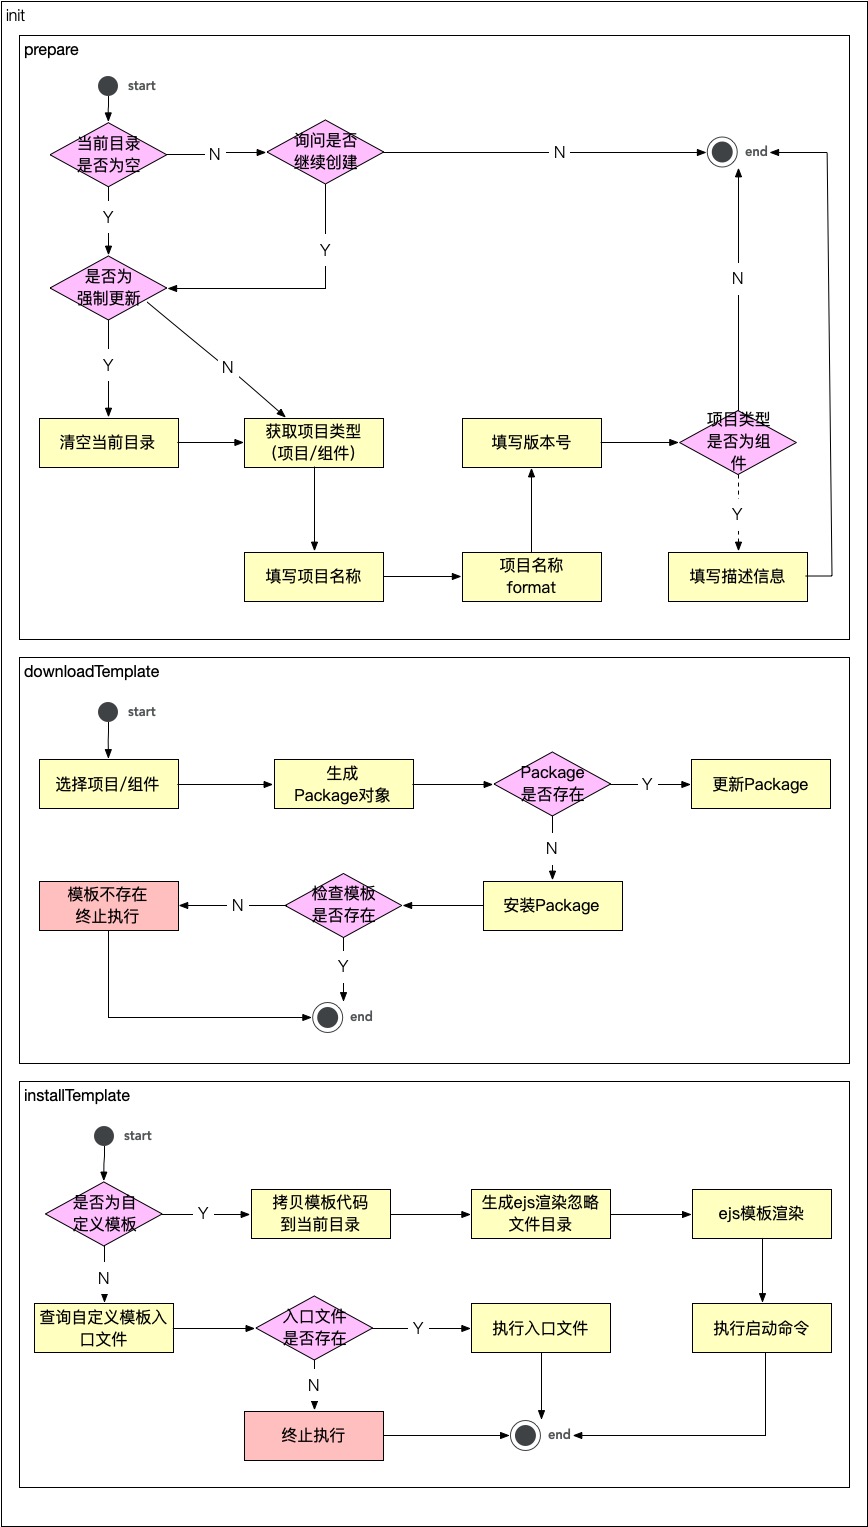
准备阶段
- 确保项目的安装环境
- 确认项目的基本信息
jsasync prepare() { // 0. 判断项目模板是否存在 const template = await getProjectTemplate(); if (!template || template.length === 0) { throw new Error('项目模板不存在'); } this.template = template; // 1. 判断当前目录是否为空 const localPath = process.cwd(); if (!this.isDirEmpty(localPath)) { let ifContinue = false; if (!this.force) { // 询问是否继续创建 ifContinue = ( await inquirer.prompt({ type: 'confirm', name: 'ifContinue', default: false, message: '当前文件夹不为空,是否继续创建项目?', }) ).ifContinue; if (!ifContinue) { return; } } // 2. 是否启动强制更新 if (ifContinue || this.force) { // 给用户做二次确认 const { confirmDelete } = await inquirer.prompt({ type: 'confirm', name: 'confirmDelete', default: false, message: '是否确认清空当前目录下的文件?', }); if (confirmDelete) { // 清空当前目录 fse.emptyDirSync(localPath); } } } return this.getProjectInfo(); }下载模板
- 下载模板利用已经封装 Package 类快速实现相关功能
jsasync downloadTemplate() { const { projectTemplate } = this.projectInfo; const templateInfo = this.template.find( (item) => item.npmName === projectTemplate ); const targetPath = path.resolve(userHome, '.pf-cli-dev', 'template'); const storeDir = path.resolve( userHome, '.pf-cli-dev', 'template', 'node_modules' ); const { npmName, version } = templateInfo; this.templateInfo = templateInfo; const templateNpm = new Package({ targetPath, storeDir, packageName: npmName, packageVersion: version, }); if (!(await templateNpm.exists())) { const spinner = spinnerStart('正在下载模板...'); await sleep(); try { await templateNpm.install(); } catch (e) { throw e; } finally { spinner.stop(true); if (await templateNpm.exists()) { log.success('下载模板成功'); this.templateNpm = templateNpm; } } } else { const spinner = spinnerStart('正在更新模板...'); await sleep(); try { await templateNpm.update(); } catch (e) { throw e; } finally { spinner.stop(true); if (await templateNpm.exists()) { log.success('更新模板成功'); this.templateNpm = templateNpm; } } } }安装模板:标准模式和自定义模式
- 标准模式,通过 ejs 实现模板渲染,并自动安装依赖并启动项目
- 自定义模式,允许用户主动去实现模板的安装过程和后续启动流程
jsasync installTemplate() { log.verbose('templateInfo', this.templateInfo); if (this.templateInfo) { if (!this.templateInfo.type) { this.templateInfo.type = TEMPLATE_TYPE_NORMAL; } if (this.templateInfo.type === TEMPLATE_TYPE_NORMAL) { // 标准安装 await this.installNormalTemplate(); } else if (this.templateInfo.type === TEMPLATE_TYPE_CUSTOM) { // 自定义安装 await this.installCustomTemplate(); } else { throw new Error('无法识别项目模板类型!'); } } else { throw new Error('项目模板信息不存在!'); } }
4.2 egg.js+云mongodb
ejj.js
初始化和项目启动方法:
bash# 初始化 $ mkdir egg-example && cd egg-example $ npm init egg --type=simple $ npm i # 项目启动 $ npm run dev $ open http://localhost:7001
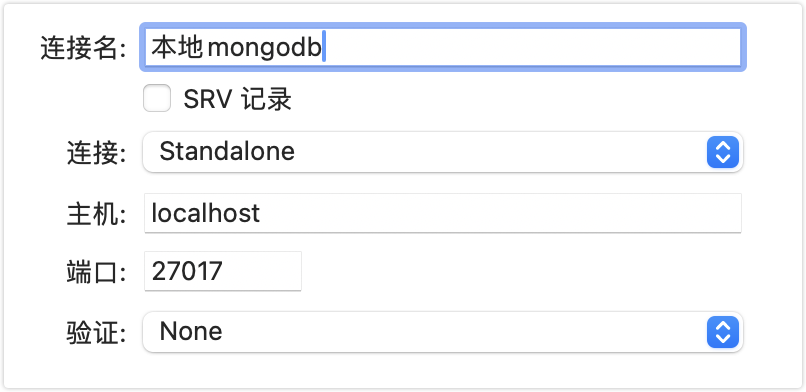
mongodb
- 云mongodb开通 地址:https://mongodb.console.aliyun.com/,创建实例并付款即可
- 本地mongodb安装 地址:https://www.runoob.com/mongodb/mongodb-tutorial.html
- mongodb使用方法 地址:https://www.runoob.com/mongodb/mongodb-databases-documents-collections.html

4.3 命令行交互原理
4.3.1 readline源码
将函数转为构造函数
jsif (!(this instanceof Interface)) { return new Interface(input, output, completer, terminal) }获取事件驱动能力
jsEventEmitter.call(this)监听键盘事件
jsemitKeypressEvents(input, this) // `input` usually refers to stdin input.on('keypress', onkeypress) input.on('end', ontermend)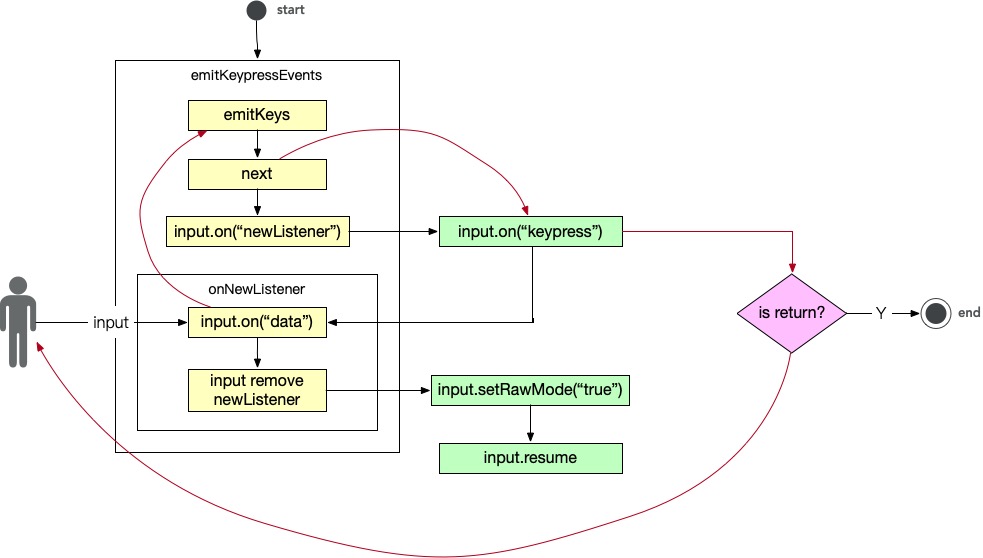
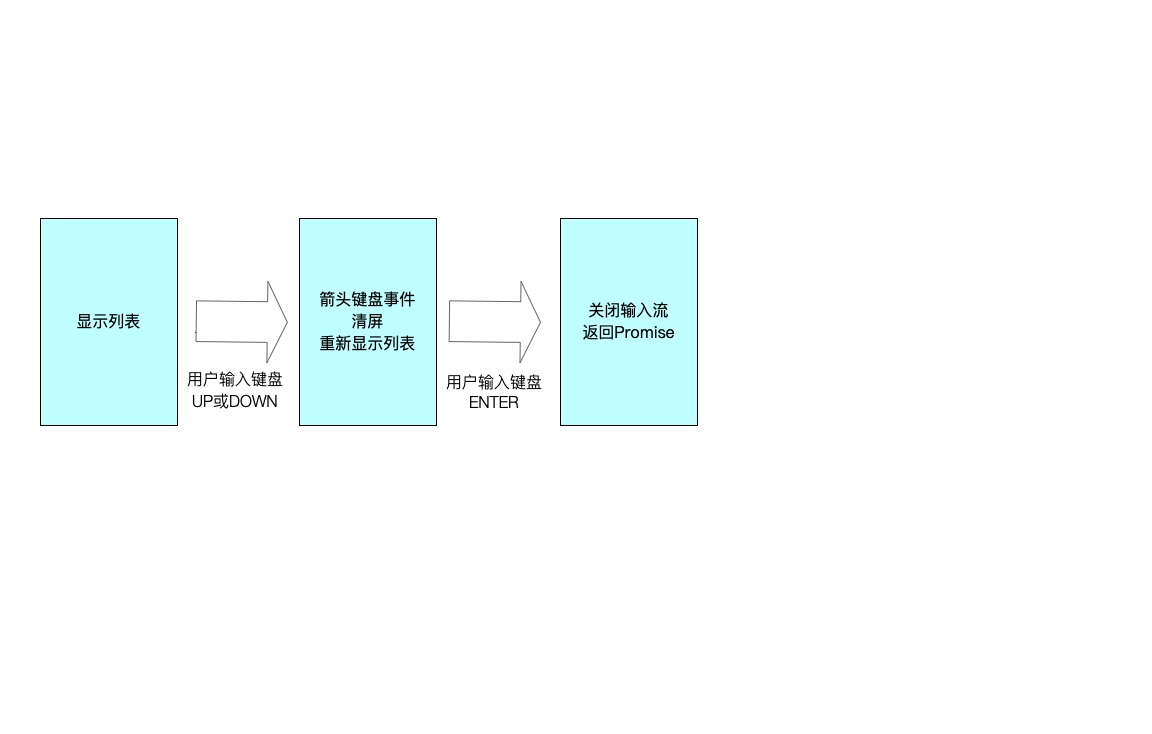
4.3.2 命令行交互列表
// 获取字符串核心实现
getContent = () => {
  if (!this.haveSelected) {
    let title =
      '\x1B[32m?\x1B[39m \x1B[1m' +
      this.message +
      '\x1B[22m\x1B[0m \x1B[0m\x1B[2m(Use arrow keys)\x1B[22m\n'
    this.choices.forEach((choice, index) => {
      if (index === this.selected) {
        if (index === this.choices.length - 1) {
          title += '\x1B[36m❯ ' + choice.name + '\x1B[39m '
        } else {
          title += '\x1B[36m❯ ' + choice.name + '\x1B[39m \n'
        }
      } else {
        if (index === this.choices.length - 1) {
          title += `  ${choice.name} `
        } else {
          title += `  ${choice.name} \n`
        }
      }
    })
    this.height = this.choices.length + 1
    return title
  } else {
    const name = this.choices[this.selected].name
    let title =
      '\x1B[32m?\x1B[39m \x1B[1m' +
      this.message +
      '\x1B[22m\x1B[0m \x1B[36m' +
      name +
      '\x1B[39m\x1B[0m \n'
    return title
  }
}
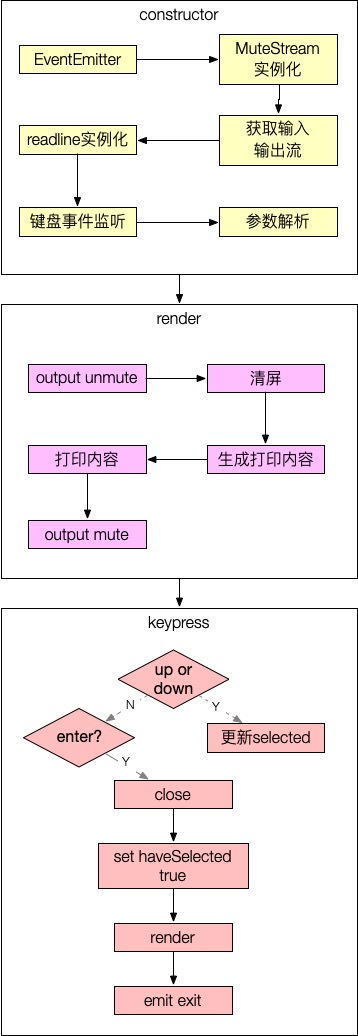
4.3.3 架构图
五、 脚手架项目和组件初始化开发
5.1 ejs模板渲染
// 用法
let template = ejs.compile(str, options)
template(data)
// => 输出渲染后的 HTML 字符串

ejs.render(str, data, options)
// => 输出渲染后的 HTML 字符串

ejs.renderFile(filename, data, options, function (err, str) {
  // str => 输出渲染后的 HTML 字符串
})// 标签含义
<% '脚本' 标签,用于流程控制,无输出。
<%_ 删除其前面的空格符
<%= 输出数据到模板(输出是转义 HTML 标签)
<%- 输出非转义的数据到模板
<%# 注释标签,不执行、不输出内容
<%% 输出字符串 '<%'
%> 一般结束标签
-%> 删除紧随其后的换行符
_%> 将结束标签后面的空格符删除// 包含
<%- include('header', { header: 'header' }); -%>
<h1>
Title
</h1>
<p>
My page
</p>
<%- include('footer', { footer: 'footer' }); -%>// 自定义分隔符
let ejs = require('ejs'),
users = ['geddy', 'neil', 'alex']
// 单个模板文件
ejs.render('<?= users.join(" | "); ?>', { users: users }, { delimiter: '?' })
// => 'geddy | neil | alex'
// 全局
ejs.delimiter = '$'
ejs.render('<$= users.join(" | "); $>', { users: users })
// => 'geddy | neil | alex'// 自定义文件加载器
let ejs = require('ejs')
let myFileLoader = function (filePath) {
return 'myFileLoader: ' + fs.readFileSync(filePath)
}
ejs.fileLoader = myFileLoad5.2 glob文件筛选
用来匹配文件路径。如
lib/**/*.js匹配 lib 目录下所有的 js 文件
node-glob匹配规则
*匹配任意 0 或多个任意字符?匹配任意一个字符[...]若字符在中括号中,则匹配。若以!或^开头,若字符不在中括号中,则匹配!(pattern|pattern|pattern)不满足括号中的所有模式则匹配?(pattern|pattern|pattern)满足 0 或 1 括号中的模式则匹配+(pattern|pattern|pattern)满足 1 或 更多括号中的模式则匹配*(a|b|c)满足 0 或 更多括号中的模式则匹配@(pattern|pat*|pat?erN)满足 1 个括号中的模式则匹配**跨路径匹配任意字符
5.3 项目标准安装和自定义安装
async installNormalTemplate() {
  log.verbose('templateNpm', this.templateNpm);
  // 拷贝模板代码至当前目录
  let spinner = spinnerStart('正在安装模板...');
  await sleep();
  const targetPath = process.cwd();
  try {
    const templatePath = path.resolve(
      this.templateNpm.cacheFilePath,
      'template'
    );
    fse.ensureDirSync(templatePath);
    fse.ensureDirSync(targetPath);
    fse.copySync(templatePath, targetPath);
  } catch (e) {
    throw e;
  } finally {
    spinner.stop(true);
    log.success('模板安装成功');
  }
  const templateIgnore = this.templateInfo.ignore || [];
  const ignore = ['**/node_modules/**', ...templateIgnore];
  await this.ejsRender({ ignore });
  // 如果是组件,则生成组件配置文件
  await this.createComponentFile(targetPath);
  const { installCommand, startCommand } = this.templateInfo;
  // 依赖安装
  await this.execCommand(installCommand, '依赖安装失败!');
  // 启动命令执行
  await this.execCommand(startCommand, '启动执行命令失败!');
}

async createComponentFile(targetPath) {
  const templateInfo = this.templateInfo;
  const projectInfo = this.projectInfo;
  if (templateInfo.tag.includes(TYPE_COMPONENT)) {
    const componentData = {
      ...projectInfo,
      buildPath: templateInfo.buildPath,
      examplePath: templateInfo.examplePath,
      npmName: templateInfo.npmName,
      npmVersion: templateInfo.version,
    };
    const componentFile = path.resolve(targetPath, COMPONENT_FILE);
    fs.writeFileSync(componentFile, JSON.stringify(componentData));
  }
}

async installCustomTemplate() {
  // 查询自定义模板的入口文件
  if (await this.templateNpm.exists()) {
    const rootFile = this.templateNpm.getRootFilePath();
    if (fs.existsSync(rootFile)) {
      log.notice('开始执行自定义模板');
      const templatePath = path.resolve(
        this.templateNpm.cacheFilePath,
        'template'
      );
      const options = {
        templateInfo: this.templateInfo,
        projectInfo: this.projectInfo,
        sourcePath: templatePath,
        targetPath: process.cwd(),
      };
      const code = `require('${rootFile}')(${JSON.stringify(options)})`;
      log.verbose('code', code);
      await execAsync('node', ['-e', code], {
        stdio: 'inherit',
        cwd: process.cwd(),
      });
      log.success('自定义模板安装成功');
    } else {
      throw new Error('自定义模板入口文件不存在!');
    }
  }
}
六、 脚手架代码片段复用模块
6.1 核心目的
- 提高人效,降低开发成本。节约工时 = 复用代码节约工时 _ 物料复用系数 _ 使用次数
6.2 思考
- 不同开发者、团队之间会产生大量重复、通用的代码
- 这些代码散落在各自团队的代码里
- 复用的时候习惯于直接拷贝代码到项目中,因为这样做对个人成本最低(开发者往往更熟悉自己写的代码)
- 但这种做法不利于团队间的代码共享,因为每个人开发不同的业务,对不同页面的熟悉程度不一样,二代码复用的宗旨就是尽可能将团队中开发者的整体水平拉齐
- 所以需要通过工具化的方式降低代码复用的成本
6.3 实践
- 可复用的代码有哪些?
- 页面、代码片段(区块)、业务组件、基础组件
- 如何提取可复用的代码,度量的标准是什么?
- 在现有项目代码中复用次数? 大于3次
- 是否被基础组件包含? 不包含
- 未来是否可能有复用厂家? 有
- 是否已经和现有复用代码重复? 不重复
- 如何管理复用代码?如何进行维护?
- 有统一的物料(对可复用代码的总称)管理平台,将物料作为资产进行管理
- 有统一的物料生产、管理、维护、消费流程和工具链
- 通过脚手架进行可复用代码的生产、维护和消费,通过平台来管理这些物料
- 如何使用复用的代码?
- 快速:手动拷贝、使用IDE能力
- 高级:脚手架安装、IDE集成(使用插件或扩展)
6.4 添加页面流程
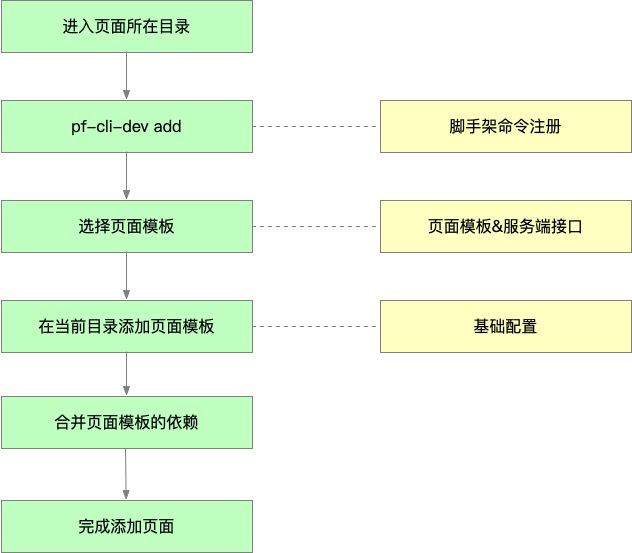
页面模板及代码片段开发
'use strict'

const fs = require('fs')
const path = require('path')
const userHome = require('user-home')
const inquirer = require('inquirer')
const pathExists = require('path-exists')
const pkgUp = require('pkg-up')
const fse = require('fs-extra')
const glob = require('glob')
const ejs = require('ejs')
const semver = require('semver')
const Command = require('@pf-scaffold/command')
const Package = require('@pf-scaffold/package')
const request = require('@pf-scaffold/request')
const log = require('@pf-scaffold/log')
const { sleep, spinnerStart, execAsync } = require('@pf-scaffold/utils')

const ADD_MODE_SECTION = 'section'
const ADD_MODE_PAGE = 'page'

const TYPE_CUSTOM = 'custom'
const TYPE_NORMAL = 'normal'

class AddCommand extends Command {
  init() {
    // 获取add命令的初始化参数
  }

  async exec() {
    // 代码片段(区块):以源码形式拷贝的vue组件
    // 1. 选择复用方式
    this.addMode = (await this.getAddMode()).addMode
    if (this.addMode === ADD_MODE_SECTION) {
      await this.installSectionTemplate()
    } else {
      await this.installPageTemplate()
    }
  }

  async installSectionTemplate() {
    // 1.获取页面安装文件夹
    this.dir = process.cwd()
    // 2.选择代码片段模板
    this.sectionTemplate = await this.getTemplate(ADD_MODE_SECTION)
    // 3.安装代码片段模板
    // 3.1 预检查(检查目录重名问题)
    await this.prepare(ADD_MODE_SECTION)
    // 3.2 代码片段模板下载
    await this.downloadTemplate(ADD_MODE_SECTION)
    // 3.3. 代码片段安装
    await this.installSection()
  }

  async installPageTemplate() {
    // 1.获取页面安装文件夹
    this.dir = process.cwd()
    // 2.选择页面模板
    this.pageTemplate = await this.getTemplate()
    // 3.安装页面模板
    // 3.1 预检查(检查目录重名问题)
    await this.prepare()
    // 3.2 将页面模板拷贝至指定目录
    await this.downloadTemplate()
    // 4.合并页面模板依赖
    // 5.页面模板安装完成
    await this.installTemplate()
  }

  async getAddMode() {
    return inquirer.prompt({
      type: 'list',
      name: 'addMode',
      message: '请选择代码复用模式',
      choices: [
        {
          name: '代码片段',
          value: ADD_MODE_SECTION
        },
        {
          name: '页面模板',
          value: ADD_MODE_PAGE
        }
      ]
    })
  }

  async prepare(addMode = ADD_MODE_PAGE) {
    // 生成最终拷贝路径
    if (addMode === ADD_MODE_PAGE) {
      this.targetPath = path.resolve(this.dir, this.pageTemplate.pageName)
    } else {
      this.targetPath = path.resolve(
        this.dir,
        'components',
        this.sectionTemplate.sectionName
      )
    }
    if (await pathExists(this.targetPath)) {
      throw new Error('页面文件夹已经存在')
    }
  }

  async downloadTemplate(addMode = ADD_MODE_PAGE) {
    // 获取模板名称
    const name = addMode === ADD_MODE_PAGE ? '页面' : '代码片段'
    // 缓存文件夹
    const targetPath = path.resolve(userHome, '.pf-scaffold', 'template')
    // 缓存真实路径
    const storeDir = path.resolve(targetPath, 'node_modules')
    const { npmName, version } =
      addMode === ADD_MODE_PAGE ? this.pageTemplate : this.sectionTemplate
    // 构建Package对象
    const templatePackage = new Package({
      targetPath,
      storeDir,
      packageName: npmName,
      packageVersion: version
    })
    // 下载页面模板
    if (!(await templatePackage.exists())) {
      const spinner = spinnerStart('正在下载' + name + '模板...')
      await sleep()
      // 下载页面模板
      try {
        await templatePackage.install()
      } catch (e) {
        throw e
      } finally {
        spinner.stop(true)
        if (await templatePackage.exists()) {
          log.success('下载' + name + '模板成功')
          if (addMode === ADD_MODE_PAGE) {
            this.pageTemplatePackage = templatePackage
          } else {
            this.sectionTemplatePackage = templatePackage
          }
        }
      }
    } else {
      const spinner = spinnerStart('正在更新' + name + '模板...')
      await sleep()
      // 更新页面模板
      try {
        await templatePackage.update()
      } catch (e) {
        throw e
      } finally {
        spinner.stop(true)
        if (await templatePackage.exists()) {
          log.success('更新' + name + '模板成功')
          if (addMode === ADD_MODE_PAGE) {
            this.pageTemplatePackage = templatePackage
          } else {
            this.sectionTemplatePackage = templatePackage
          }
        }
      }
    }
  }

  async installSection() {
    // 1. 选择要插入的源码文件
    const files = fs
      .readdirSync(this.dir, { withFileTypes: true })
      .map((file) => (file.isFile() ? file.name : null))
      .filter((_) => _)
      .map((file) => ({ name: file, value: file }))
    if (files.length === 0) {
      throw new Error('当前文件夹下没有文件')
    }
    const codeFile = (
      await inquirer.prompt({
        type: 'list',
        message: '请选择要插入代码片段的源码文件',
        name: 'codeFile',
        choices: files
      })
    ).codeFile
    // 2. 需要用户输入插入行数
    const lineNumber = (
      await inquirer.prompt({
        type: 'input',
        message: '请输入要插入的行数',
        name: 'lineNumber',
        validate: function (value) {
          const done = this.async()
          if (!value || !value.trim()) {
            done('插入的行数不能为空')
          } else if (value >= 0 && Math.floor(value) === Number(value)) {
            done(null, true)
          } else {
            done('插入的行数必须为整数')
          }
        }
      })
    ).lineNumber
    log.verbose('codeFile:', codeFile)
    log.verbose('lineNumber:', lineNumber)
    // 3. 对源码文件进行分割成数组
    const codeFilePath = path.resolve(this.dir, codeFile)
    const codeContent = fs.readFileSync(codeFilePath, 'utf-8')
    const codeCotnentArr = codeContent.split('\n')
    // 4. 以数组形式插入代码片段
    const componentName = this.sectionTemplate.sectionName.toLocaleLowerCase()
    const componentNameOriginal = this.sectionTemplate.sectionName
    codeCotnentArr.splice(
      lineNumber,
      0,
      `<${componentName}></${componentName}>`
    )
    // 5. 插入代码片段的import语句
    const scriptIndex = codeCotnentArr.findIndex(
      (code) => code.replace(/\s/g, '') === '<script>'
    )
    codeCotnentArr.splice(
      scriptIndex + 1,
      0,
      `import ${componentNameOriginal} from './components/${componentNameOriginal}/index.vue'`
    )
    log.verbose('codeCotnentArr', codeCotnentArr)
    // 6. 将代码还原为string
    const newCodeContent = codeCotnentArr.join('\n')
    fs.writeFileSync(codeFilePath, newCodeContent, 'utf-8')
    log.success('代码片段写入成功')
    // 7. 创建代码片段组件目录
    fse.ensureDirSync(this.targetPath)
    const templatePath = path.resolve(
      this.sectionTemplatePackage.cacheFilePath,
      'template',
      this.sectionTemplate.targetPath ? this.sectionTemplate.targetPath : ''
    )
    const targetPath = this.targetPath
    fse.copySync(templatePath, targetPath)
    log.success('代码片段拷贝成功')
  }

  async installTemplate() {
    log.info('正在安装页面模板')
    log.verbose('pageTemplate', this.pageTemplate)
    // 模板路径
    const templatePath = path.resolve(
      this.pageTemplatePackage.cacheFilePath,
      'template',
      this.pageTemplate.targetPath
    )
    // 目标路径
    const targetPath = this.targetPath
    if (!(await pathExists(templatePath))) {
      throw new Error('页面模板不存在!')
    }
    log.verbose('templatePath', templatePath)
    log.verbose('targetPath', targetPath)
    fse.ensureDirSync(templatePath)
    fse.ensureDirSync(targetPath)
    if (this.pageTemplate.type === TYPE_CUSTOM) {
      await this.installCustomPageTemplate({ templatePath, targetPath })
    } else {
      await this.installNormalPageTemplate({ templatePath, targetPath })
    }
  }

  async installCustomPageTemplate({ templatePath, targetPath }) {
    // 1. 获取自定义模板的入口文件
    const rootFile = this.pageTemplatePackage.getRootFilePath()
    if (fs.existsSync(rootFile)) {
      log.notice('开始执行自定义模板')
      const options = {
        templatePath,
        targetPath,
        pageTemplate: this.pageTemplate
      }
      const code = `require('${rootFile}')(${JSON.stringify(options)})`
      await execAsync('node', ['-e', code], {
        stdio: 'inherit',
        cwd: process.cwd()
      })
      log.success('自定义模板安装成功')
    } else {
      throw new Error('自定义模板入口文件不存在')
    }
  }

  async installNormalPageTemplate({ templatePath, targetPath }) {
    fse.copySync(templatePath, targetPath)
    await this.ejsRender({ targetPath })
    await this.dependenciesMerge({ templatePath, targetPath })
    log.success('安装页面模板成功')
  }

  async ejsRender(options) {
    const { targetPath } = options
    const pageTemplate = this.pageTemplate
    const { ignore } = pageTemplate
    return new Promise((resolve, reject) => {
      glob(
        '**',
        {
          cwd: targetPath,
          nodir: true,
          ignore: ignore || ''
        },
        function (err, files) {
          log.verbose('files', files)
          if (err) {
            reject(err)
          } else {
            Promise.all(
              files.map((file) => {
                // 获取文件的真实路径
                const filePath = path.resolve(targetPath, file)
                return new Promise((resolve1, reject1) => {
                  // ejs文件渲染, 重新拼接render的参数
                  ejs.renderFile(
                    filePath,
                    {
                      name: pageTemplate.pageName.toLocaleLowerCase()
                    },
                    {},
                    (err, result) => {
                      if (err) {
                        reject1(err)
                      } else {
                        // 重新写入文件信息
                        fse.writeFileSync(filePath, result)
                        resolve1(result)
                      }
                    }
                  )
                })
              })
            )
              .then(resolve)
              .catch((e) => reject(e))
          }
        }
      )
    })
  }

  async dependenciesMerge(options) {
    function objToArray(o) {
      const arr = []
      Object.keys(o).forEach((key) => {
        arr.push({
          key,
          value: o[key]
        })
      })
      return arr
    }

    function arrayToObj(arr) {
      const o = {}
      arr.forEach((item) => (o[item.key] = item.value))
      return o
    }

    function depDiff(templateDepArr, targetDepArr) {
      let finalDep = [...targetDepArr]
      // 1.场景1:模板中存在依赖,项目中不存在(拷贝依赖)
      // 2.场景2:模板中存在依赖,项目也存在(不会拷贝依赖,但是会在脚手架中给予提示,让开发者手动进行处理)
      templateDepArr.forEach((templateDep) => {
        const duplicatedDep = targetDepArr.find(
          (targetDep) => templateDep.key === targetDep.key
        )
        if (duplicatedDep) {
          log.verbose('查询到重复依赖:', duplicatedDep)
          const templateRange = semver
            .validRange(templateDep.value)
            .split('<')[1]
          const targetRange = semver
            .validRange(duplicatedDep.value)
            .split('<')[1]
          if (templateRange !== targetRange) {
            log.warn(
              `${templateDep.key}冲突,${templateDep.value} => ${duplicatedDep.value}`
            )
          }
        } else {
          log.verbose('查询到新依赖:', templateDep)
          finalDep.push(templateDep)
        }
      })
      return finalDep
    }

    // 处理依赖合并问题
    // 1. 获取package.json
    const { templatePath, targetPath } = options
    const templatePkgPath = pkgUp.sync({ cwd: templatePath })
    const targetPkgPath = pkgUp.sync({ cwd: targetPath })
    const templatePkg = fse.readJsonSync(templatePkgPath)
    const targetPkg = fse.readJsonSync(targetPkgPath)
    // 2. 获取dependencies
    const templateDep = templatePkg.dependencies || {}
    const targetDep = targetPkg.dependencies || {}
    // 3. 将对象转化为数组
    const templateDepArr = objToArray(templateDep)
    const targetDepArr = objToArray(targetDep)
    // 4. 实现dep之间的diff
    const newDep = depDiff(templateDepArr, targetDepArr)
    targetPkg.dependencies = arrayToObj(newDep)
    fse.writeJsonSync(targetPkgPath, targetPkg, { spaces: 2 })
    // 5. 自动安装依赖
    log.info('正在安装页面模板的依赖')
    await this.execCommand('npm install', path.dirname(targetPkgPath))
    log.success('安装页面模板依赖成功')
  }

  async execCommand(command, cwd) {
    let ret
    if (command) {
      // npm install => [npm, install] => npm, [install]
      const cmdArray = command.split(' ')
      const cmd = cmdArray[0]
      const args = cmdArray.slice(1)
      ret = await execAsync(cmd, args, {
        stdio: 'inherit',
        cwd
      })
    }
    if (ret !== 0) {
      throw new Error(command + ' 命令执行失败')
    }
    return ret
  }

  async getTemplate(addMode = ADD_MODE_PAGE) {
    const name = addMode === ADD_MODE_PAGE ? '页面' : '代码片段'
    // 通过API获取模板列表
    if (addMode === ADD_MODE_PAGE) {
      const pageTemplateData = await this.getPageTemplate()
      this.pageTemplateData = pageTemplateData
    } else {
      const sectionTemplateData = await this.getSectionTemplate()
      this.sectionTemplateData = sectionTemplateData
    }
    const TEMPLATE =
      addMode === ADD_MODE_PAGE
        ? this.pageTemplateData
        : this.sectionTemplateData
    const pageTemplateName = (
      await inquirer.prompt({
        type: 'list',
        name: 'pageTemplate',
        message: '请选择' + name + '模板',
        choices: this.createChoices(addMode)
      })
    ).pageTemplate
    // 2.1 输入页面名称
    const pageTemplate = TEMPLATE.find(
      (item) => item.npmName === pageTemplateName
    )
    if (!pageTemplate) {
      throw new Error(name + '模板不存在!')
    }
    const { pageName } = await inquirer.prompt({
      type: 'input',
      name: 'pageName',
      message: '请输入' + name + '名称',
      default: '',
      validate: function (value) {
        const done = this.async()
        if (!value || !value.trim()) {
          done('请输入页面名称')
          return
        }
        done(null, true)
      }
    })
    if (addMode === ADD_MODE_PAGE) {
      pageTemplate.pageName = pageName.trim()
    } else {
      pageTemplate.sectionName = pageName.trim()
    }
    return pageTemplate
  }

  getPageTemplate() {
    return request({
      url: '/page/template',
      method: 'get'
    })
  }

  async getSectionTemplate() {
    return request({
      url: '/section/template',
      method: 'get'
    })
  }

  createChoices(addMode) {
    return addMode === ADD_MODE_PAGE
      ? this.pageTemplateData.map((item) => ({
          name: item.name,
          value: item.npmName
        }))
      : this.sectionTemplateData.map((item) => ({
          name: item.name,
          value: item.npmName
        }))
  }
}

function add(argv) {
  log.verbose('argv', argv)
  return new AddCommand(argv)
}

module.exports = add
module.exports.AddCommand = AddCommand
七、 脚手架发布模块架构设计和核心流程开发
7.1 前端发布
7.1.1 前端发布架构设计
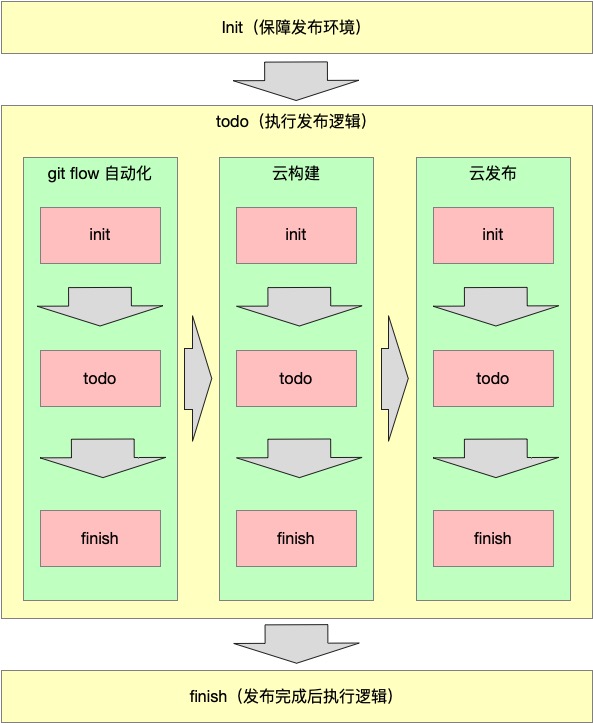
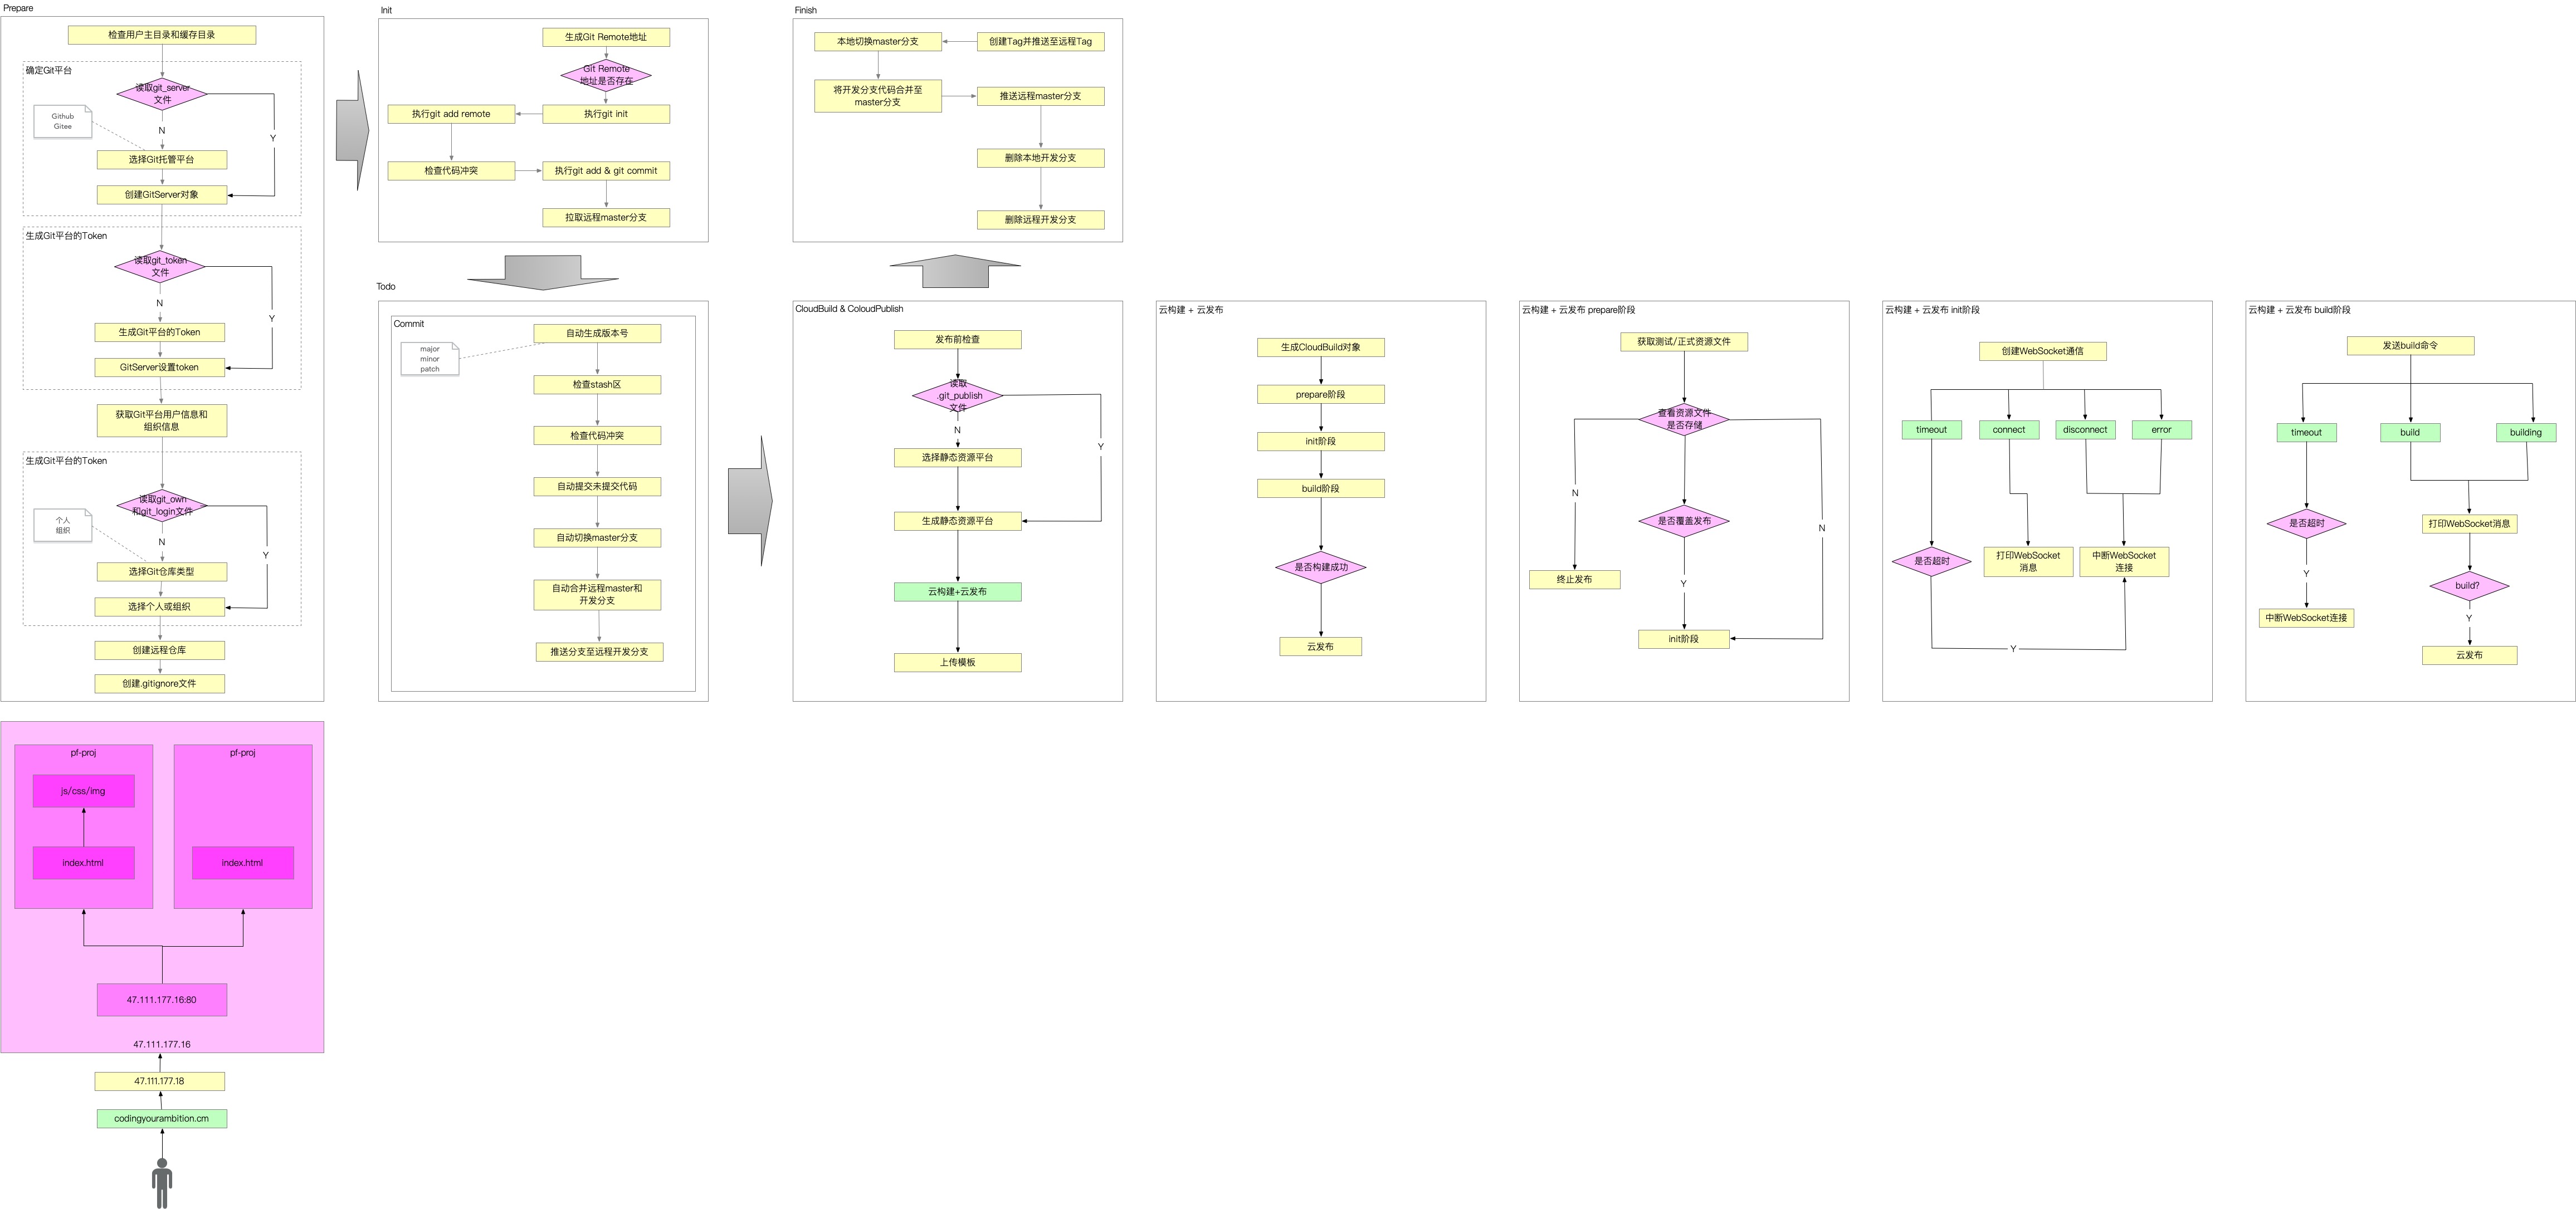
#####7.1.2 前端发布GitFlow+云构建+云发布
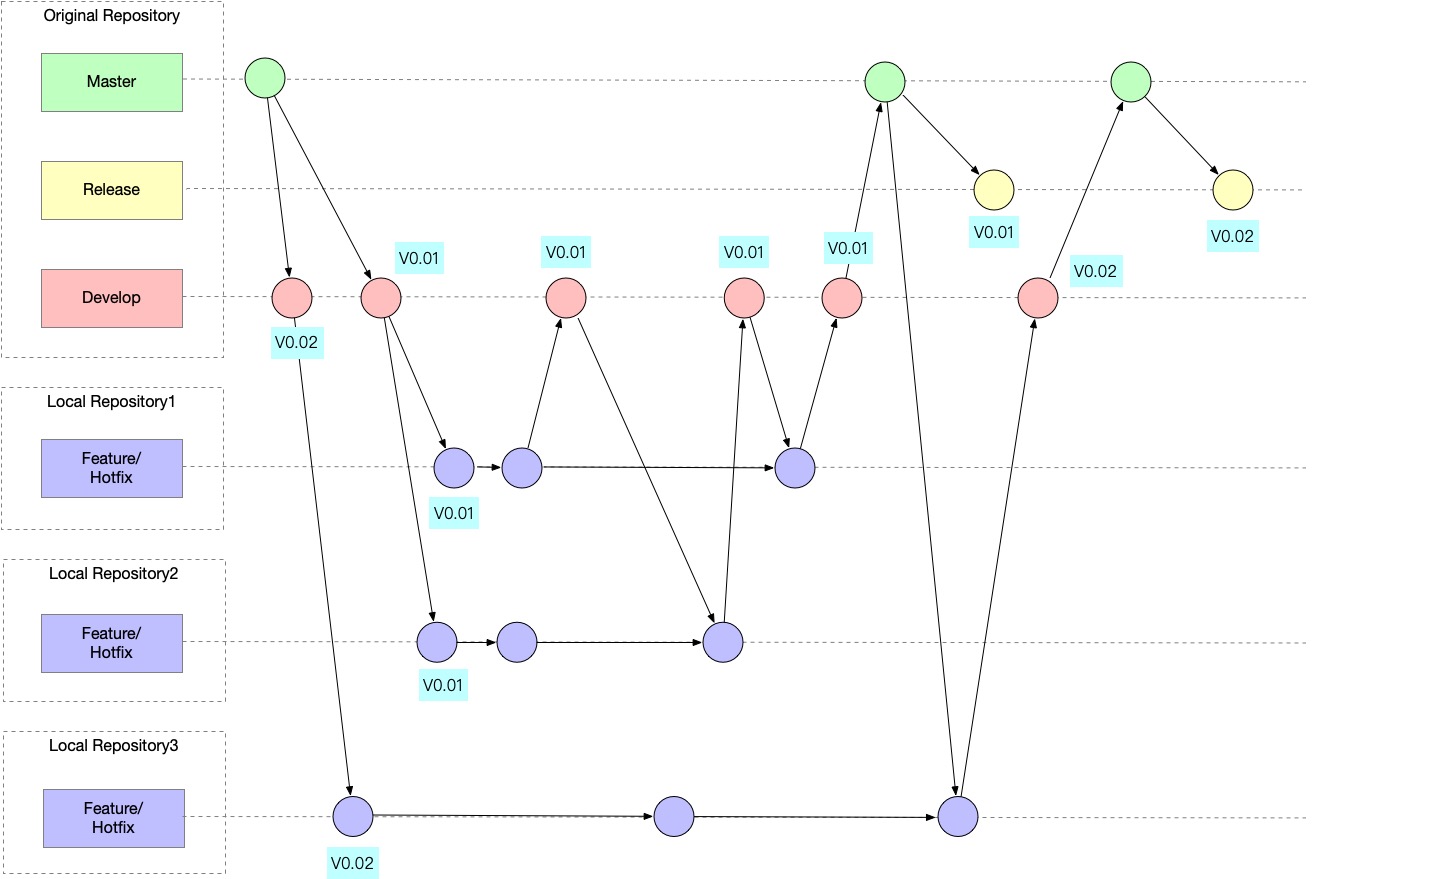
7.1.3 GitFlow多人协作流程
7.2 前端路由 vue-router
7.2.1 VueRouter原理
- history 和 hash 模式的区别是什么?
- 格式不同
- 部署方式不同,history 需要服务端增加 fallback 到 index.html 的配置
- history 对 SEO 更加友好
- Vue dev 模式下为什么不需要配置 history fallback?
- webpack-dev-server 中配置了 historyApiFallback,通过 rewrites 属性设定了 fallback 到 index.html 的逻辑
- 我们并没有定义 router-link 和 router-view,为什么代码里能直接使用?
- app.use(router) 时调用 vue-router 插件,其中主要做了三件事:
- 定义 router-view 和 router-link 组件
- 在 vue 实例上挂载了 $router 和 $route 属性
- 通过 provide 特性向组件透传了 currentRoute 等属性
- app.use(router) 时调用 vue-router 插件,其中主要做了三件事:
- 浏览器中如何实现 URL 变化但页面不刷新?
- push 底层过程中调用了 window.history.pushState 和 window.history.replaceState,确保了 URL 变化但是页面不会刷新
- vue-router 如何实现路由匹配?
- createRouter 时通过 createRouterMatcher 生成 Matcher 对象,确定了每个路由对应的正则表达式
- 路由跳转时会调用 push 方法,该方法中会调用 resolve 方法,该方法中会将当前页面路由和正则表达式进行匹配,并获得匹配到的路由 Matcher 对象
- router-view 如何实现组件动态渲染?
- 通过 inject 获取 currentRoute
- 通过 currentRoute 中的 Matcher 获取需要渲染的组件
- 通过 vue3 的 h 方法动态渲染组件
八、脚手架发布模块git自动化流程开发
8.1 GitFlow实战
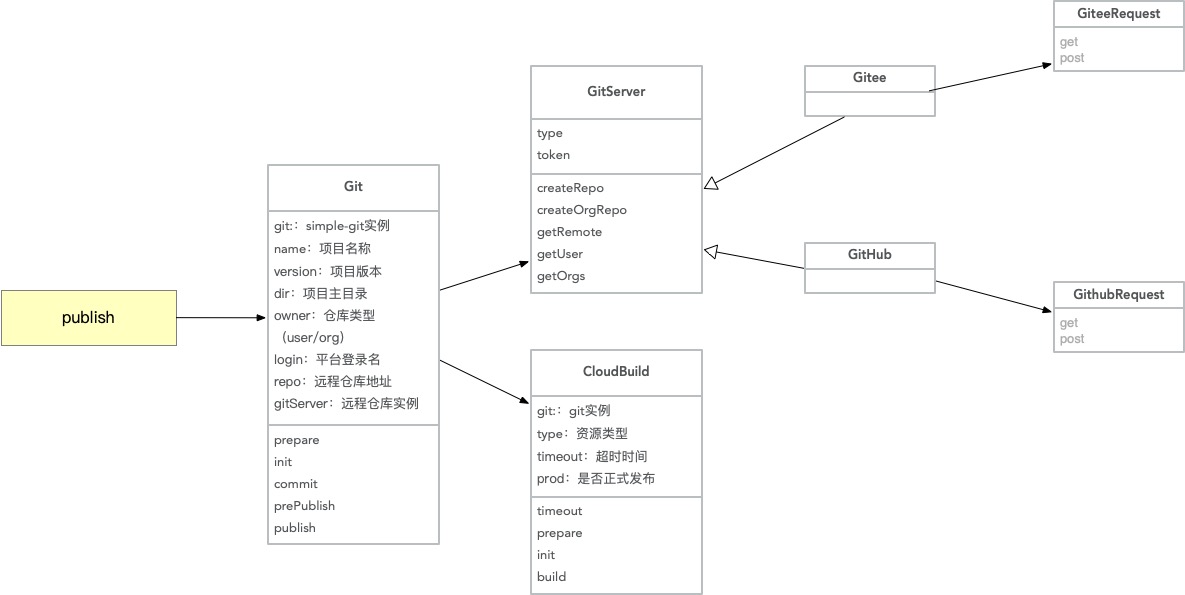
- Git:Git 自动化的核心类
- GitServer:Git 远程仓库基类
- Gitee:继承 GitServer,用于调用 Gitee API 和获取基本信息
- Github:继承 GitServer,用于调用 Github API 和获取基本信息
- GiteeRequest:封装 Gitee API 调用基本方法
- GithubRequest:封装 Github API 调用基本方法
- CloudBuild:云构建核心类
8.2 通过sample-git操作git命令
class Git {
  constructor(
    { name, version, dir },
    {
      refreshServer = false,
      refreshToken = false,
      refreshOwner = false,
      buildCmd = '',
      prod = false,
      sshUser = '',
      sshIp = '',
      sshPath = ''
    }
  ) {
    if (name.startsWith('@') && name.indexOf('/') > 0) {
      // @pf-scaffold/component-test => pf-scaffold_component-test
      const nameArray = name.split('/')
      this.name = nameArray.join('_').replace('@', '')
    } else {
      this.name = name // 项目名称
    }
    this.version = version // 项目版本
    this.dir = dir // 源码目录
    this.git = SimpleGit(dir) // SimpleGit实例
    this.gitServer = null // GitServer实例
    this.homePath = null // 本地缓存目录
    this.user = null // 用户信息
    this.orgs = null // 用户所属组织列表
    this.owner = null // 远程仓库类型
    this.login = null // 远程仓库登录名
    this.repo = null // 远程仓库信息
    this.refreshServer = refreshServer // 是否强制刷新远程仓库
    this.refreshToken = refreshToken // 是否强化刷新远程仓库token
    this.refreshOwner = refreshOwner // 是否强化刷新远程仓库类型
    this.branch = null // 本地开发分支
    this.buildCmd = buildCmd // 构建命令
    this.gitPublish = null // 静态资源服务器类型
    this.prod = prod // 是否正式发布
    this.sshUser = sshUser
    this.sshIp = sshIp
    this.sshPath = sshPath
    log.verbose('ssh config', this.sshUser, this.sshIp, this.sshPath)
  }

  async prepare() {
    this.checkHomePath() // 检查缓存主目录
    await this.checkGitServer() // 检查用户远程仓库类型
    await this.checkGitToken() // 获取远程仓库Token
    await this.getUserAndOrgs() // 获取远程仓库用户和组织信息
    await this.checkGitOwner() // 确认远程仓库类型
    await this.checkRepo() // 检查并创建远程仓库
    this.checkGitIgnore() // 检查并创建.gitignore文件
    await this.checkComponent() // 组件合法性检查
    await this.init() // 完成本地仓库初始化
  }

  getPackageJson() {
    const pkgPath = path.resolve(this.dir, 'package.json')
    if (!fs.existsSync(pkgPath)) {
      throw new Error(`package.json 不存在!源码目录:${this.dir}`)
    }
    return fse.readJsonSync(pkgPath)
  }

  isComponent() {
    const componentFilePath = path.resolve(this.dir, COMPONENT_FILE)
    return (
      fs.existsSync(componentFilePath) && fse.readJsonSync(componentFilePath)
    )
  }

  async checkComponent() {
    let componentFile = this.isComponent()
    if (componentFile) {
      log.info('开始检查build结果')
      if (!this.buildCmd) {
        this.buildCmd = 'npm run build'
      }
      require('child_process').execSync(this.buildCmd, {
        cwd: this.dir
      })
      const buildPath = path.resolve(this.dir, componentFile.buildPath)
      if (!fs.existsSync(buildPath)) {
        throw new Error(`构建结果: ${buildPath}不存在`)
      }
      const pkg = this.getPackageJson()
      if (!pkg.file || !pkg.files.includes(componentFile.buildPath)) {
        throw new Error(
          `package.json中files属性未添加构建结果目录:[${componentFile.buildPath}],请在package.json中手动添加!`
        )
      }
      log.success('build结果检查通过!')
    }
  }

  async pushRemoteRepo(branchName) {
    await this.git.push('origin', branchName)
    log.success('推送代码成功')
  }

  async pullRemoteRepo(branchName, options) {
    log.info(`同步远程${branchName}分支代码`)
    try {
      await this.git.pull('origin', branchName, options)
    } catch (err) {
      log.error(err.message)
      throw new Error('拉取远程分支失败') // 抛出异常以便在调用处捕获
    }
  }

  async checkRemoteMaster() {
    return (
      (await this.git.listRemote(['--refs'])).indexOf('refs/heads/main') >= 0
    )
  }

  async checkNotCommitted() {
    const status = await this.git.status()
    if (
      status.not_added.length > 0 ||
      status.created.length > 0 ||
      status.deleted.length > 0 ||
      status.modified.length > 0 ||
      status.renamed.length > 0
    ) {
      log.verbose('status', status)
      await this.git.add('.')
      let message
      while (!message) {
        message = (
          await inquirer.prompt({
            type: 'text',
            name: 'message',
            message: '请输入commit信息:'
          })
        ).message
      }
      await this.git.commit(message)
      log.success('本次commit提交成功')
    }
  }

  async checkConflicted() {
    log.info('代码冲突检查')
    const status = await this.git.status()
    if (status.conflicted.length > 0) {
      throw new Error('当前代码存在冲突,请手动处理合并后再试!')
    }
    log.success('代码冲突检查通过')
  }

  async initCommit() {
    await this.checkConflicted()
    await this.checkNotCommitted()
    if (await this.checkRemoteMaster()) {
      try {
        // 首先获取远程分支的最新状态
        await this.git.fetch('origin')
        // 然后尝试合并,允许不相关的历史
        await this.git.merge(['origin/main', '--allow-unrelated-histories'])
      } catch (error) {
        log.error('拉取远程分支失败,尝试合并本地更改')
        log.error(error.message)
        // 如果合并失败,考虑重置本地分支
        await this.git.reset(['--hard', 'origin/main'])
      }
    } else {
      await this.pushRemoteRepo('main')
    }
  }

  async initAndAddRemote() {
    log.info('执行git初始化')
    await this.git.init(this.dir)
    log.info('添加git remote')
    const remotes = await this.git.getRemotes()
    log.verbose('git remotes', remotes)
    if (!remotes.find((item) => item.name === 'origin')) {
      await this.git.addRemote('origin', this.remote)
    }
  }

  getRemote() {
    const gitPath = path.resolve(this.dir, GIT_ROOT_DIR)
    this.remote = this.gitServer.getRemote(this.login, this.name)
    if (fs.existsSync(gitPath)) {
      log.success('git已完成初始化')
      return true
    }
  }

  async init() {
    if (await this.getRemote()) {
      return
    }
    await this.initAndAddRemote()
    await this.initCommit()
  }

  checkGitIgnore() {
    const gitIgnore = path.resolve(this.dir, GIT_IGNORE_FILE)
    if (!fs.existsSync(gitIgnore)) {
      writeFile(
        gitIgnore,
        `.DS_Store
node_modules
/dist


# local env files
.env.local
.env.*.local

# Log files
npm-debug.log*
yarn-debug.log*
yarn-error.log*
pnpm-debug.log*

# Editor directories and files
.idea
.vscode
*.suo
*.ntvs*
*.njsproj
*.sln
*.sw?`
      )
      log.success(`自动写入${GIT_IGNORE_FILE}文件成功`)
    }
  }

  async checkRepo() {
    let repo = await this.gitServer.getRepo(this.login, this.name)
    if (!repo) {
      let spinner = spinnerStart('开始创建远程仓库...')
      try {
        if (this.owner === REPO_OWNER_USER) {
          repo = await this.gitServer.createRepo(this.name)
        } else {
          this.gitServer.createOrgRepo(this.name, this.login)
        }
      } catch (e) {
        log.error(e)
      } finally {
        spinner.stop(true)
      }
      if (repo) {
        log.success('远程仓库创建成功')
      } else {
        throw new Error('远程仓库创建失败')
      }
    } else {
      log.success('远程仓库信息获取成功')
    }
    log.verbose('repo', repo)
    this.repo = repo
  }

  async checkGitOwner() {
    const ownerPath = this.createPath(GIT_OWN_FILE)
    const loginPath = this.createPath(GIT_LOGIN_FILE)
    let owner = readFile(ownerPath)
    let login = readFile(loginPath)
    if (!owner || !login || this.refreshOwner) {
      owner = (
        await inquirer.prompt({
          type: 'list',
          name: 'owner',
          message: '请选择远程仓库类型',
          default: REPO_OWNER_USER,
          choices: this.orgs.length > 0 ? GIT_OWNER_TYPE : GIT_OWNER_TYPE_ONLY
        })
      ).owner
      if (owner === REPO_OWNER_USER) {
        login = this.user.login
      } else {
        login = (
          await inquirer.prompt({
            type: 'list',
            name: 'login',
            message: '请选择',
            choices: this.orgs.map((item) => ({
              name: item.login,
              value: item.login
            }))
          })
        ).login
      }
      writeFile(ownerPath, owner)
      writeFile(loginPath, login)
      log.success('owner写入成功', `${owner} -> ${ownerPath}`)
      log.success('login写入成功', `${login}-> ${loginPath}`)
    } else {
      log.success('owner获取成功', owner)
      log.success('login获取成功', login)
    }
    this.owner = owner
    this.login = login
  }

  async getUserAndOrgs() {
    this.user = await this.gitServer.getUser()
    if (!this.user) {
      throw new Error('用户信息获取失败')
    }
    log.verbose('user', this.user)
    this.orgs = await this.gitServer.getOrg(this.user.login)
    if (!this.orgs) {
      throw new Error('组织信息获取失败')
    }
    log.verbose('orgs', this.orgs)
    log.success(this.gitServer.type + ' 用户和组织信息获取成功')
  }

  async checkGitToken() {
    const tokenPath = this.createPath(GIT_TOKEN_FILE)
    let token = readFile(tokenPath)
    if (!token || this.refreshToken) {
      log.warn(
        this.gitServer.type + ' token未生成',
        '请先生成' +
          this.gitServer.type +
          ' token,' +
          terminalLink('链接', this.gitServer.getTokenUrl())
      )
      token = (
        await inquirer.prompt({
          type: 'password',
          name: 'token',
          message: '请将token复制到这里',
          default: ''
        })
      ).token
      writeFile(tokenPath, token)
      log.success('token写入成功', `${token} -> ${tokenPath}`)
    } else {
      log.success('token获取成功', tokenPath)
    }
    this.token = token
    this.gitServer.setToken(token)
  }

  createGitServer(gitServer = '') {
    if (gitServer === GITHUB) {
      return new Github()
    } else if (gitServer === GITEE) {
      return new Gitee()
    }
    return null
  }

  createPath(file) {
    const rootDir = path.resolve(this.homePath, GIT_ROOT_DIR)
    const filePath = path.resolve(rootDir, file)
    fse.ensureDirSync(rootDir)
    return filePath
  }

  async checkGitServer() {
    const gitServerPath = this.createPath(GIT_SERVER_FILE)
    let gitServer = readFile(gitServerPath)
    console.log(gitServerPath, gitServer)
    if (!gitServer || this.refreshServer) {
      gitServer = (
        await inquirer.prompt({
          type: 'list',
          name: 'gitServer',
          message: '请选择您想要托管的Git平台',
          default: GITHUB,
          choices: GIT_SERVER_TYPE
        })
      ).gitServer
      writeFile(gitServerPath, gitServer)
      log.success('git server写入成功', `${gitServer} -> ${gitServerPath}`)
    } else {
      log.success('git server获取成功', gitServer)
    }
    this.gitServer = this.createGitServer(gitServer)
    if (!this.gitServer) {
      throw new Error('GitServer初始化失败!')
    }
  }

  checkHomePath() {
    if (!this.homePath) {
      if (process.env.CLI_HOME_PATH) {
        this.homePath = process.env.CLI_HOME_PATH
      } else {
        this.homePath = path.resolve(userHome, DEFAULT_CLI_HOME)
      }
    }
    log.verbose('home', this.homePath)
    fse.ensureDirSync(this.homePath)
    if (!fs.existsSync(this.homePath)) {
      throw new Error('用户主目录获取失败!')
    }
  }

  async commit() {
    // 1. 生成开发分支
    await this.getCorrectVersion()
    // 2. 检查stash区
    await this.checkStash()
    // 3. 检查代码冲突
    await this.checkConflicted()
    // 4. 检查未提交代码
    await this.checkNotCommitted()
    // 5. 切换开发分支
    await this.checkoutBranch(this.branch)
    // 6. 合并远程master/main分支和开发分支代码
    await this.pullRemoteMasterAndBranch()
    // 7. 将开发分支推送到远程仓库
    await this.pushRemoteRepo(this.branch)
  }

  async pullRemoteMasterAndBranch() {
    log.info(`合并 [main] -> [${this.branch}]`)
    await this.pullRemoteRepo('main')
    log.success('合并远程 [main] 分支代码成功')
    await this.checkConflicted()
    log.info('检查远程开发分支')
    const remoteBranchList = await this.getRemoteBranchList()
    if (remoteBranchList.indexOf(this.version) >= 0) {
      log.info(`合并 [${this.branch}] -> [${this.branch}]`)
      await this.pullRemoteRepo(this.branch)
      log.success(`合并远程 [${this.branch}] 分支代码成功`)
      await this.checkConflicted()
    } else {
      log.success(`不存在远程分支 [${this.branch}]`)
    }
  }

  async checkoutBranch(branch) {
    const localBranchList = await this.git.branchLocal()
    if (localBranchList.all.indexOf(branch) >= 0) {
      await this.git.checkout(branch)
    } else {
      await this.git.checkoutLocalBranch(branch)
    }
    log.success(`分支切换到${branch}`)
  }

  async checkStash() {
    log.info('检查stash记录')
    const stashList = await this.git.stashList()
    if (stashList.all.length > 0) {
      await this.git.stash(['pop'])
      log.success('stash pop 成功')
    }
  }

  async getRemoteBranchList(type) {
    const remoteList = await this.git.listRemote(['--refs'])
    let reg
    if (type === VERSION_RELEASE) {
      reg = /.+?refs\/tags\/release\/(\d+\.\d+\.\d+)/g
    } else {
      reg = /.+?refs\/heads\/dev\/(\d+\.\d+\.\d+)/g
    }
    return remoteList
      .split('\n')
      .map((remote) => {
        const match = reg.exec(remote)
        reg.lastIndex = 0
        if (match && semver.valid(match[1])) {
          return match[1]
        }
      })
      .filter((_) => _)
      .sort((a, b) => {
        if (semver.lte(b, a)) {
          if (a === b) return 0
          return -1
        }
        return 1
      })
  }

  syncVersionToPackageJson() {
    const pkg = fse.readJsonSync(`${this.dir}/package.json`)
    if (pkg && pkg.version !== this.version) {
      pkg.version = this.version
      fse.writeJsonSync(`${this.dir}/package.json`, pkg, { spaces: 2 })
    }
  }

  async getCorrectVersion() {
    // 1. 获取远程分布分支
    // 版本号规范:release/x.y.z,dev/x.y.z
    // 版本号递增规范:major/minor/patch
    log.info('获取代码分支')
    const remoteBranchList = await this.getRemoteBranchList(VERSION_RELEASE)
    let releaseVersion = null
    if (remoteBranchList && remoteBranchList.length > 0) {
      releaseVersion = remoteBranchList[0]
    }
    log.verbose('线上最新版本号', releaseVersion)
    // 2. 生成本地开发分支
    const devVersion = this.version
    if (!releaseVersion) {
      this.branch = `${VERSION_DEVELOP}/${devVersion}`
    } else if (semver.gt(this.version, releaseVersion)) {
      log.info('当前版本大于线上最新版本', `${devVersion} >= ${releaseVersion}`)
      this.branch = `${VERSION_DEVELOP}/${devVersion}`
    } else {
      log.info('当前线上版本大于本地版本', `${releaseVersion} > ${devVersion}`)
      const incType = (
        await inquirer.prompt({
          type: 'list',
          name: 'incType',
          message: '自动升级版本, 请选择升级版本类型',
          default: 'patch',
          choices: [
            {
              name: `小版本(${releaseVersion} -> ${semver.inc(
                releaseVersion,
                'patch'
              )})`,
              value: 'patch'
            },
            {
              name: `中版本(${releaseVersion} -> ${semver.inc(
                releaseVersion,
                'minor'
              )})`,
              value: 'minor'
            },
            {
              name: `大版本(${releaseVersion} -> ${semver.inc(
                releaseVersion,
                'major'
              )})`,
              value: 'major'
            }
          ]
        })
      ).incType
      const incVersion = semver.inc(releaseVersion, incType)
      this.branch = `${VERSION_DEVELOP}/${incVersion}`
      this.version = incVersion
    }
    log.verbose('本地开发分支', this.branch)
    // 3. 将version同步到package.json
    this.syncVersionToPackageJson()
  }

  async publish() {}
}
8.3 Github和Gitee OpenAPI接入
Github API 接入
接入流程:
创建 SSH 帮助文档:https://docs.github.com/en/github/authenticating-to-github/connecting-to-github-with-ssh
- 查看 API 列表:https://docs.github.com/cn/rest
课程采用 Restful API
- 调用 API 时需要在 header 中携带 token:
config.headers['Authorization'] = `token ${this.token}`Gitee API 接入
接入流程:
创建 SSH 帮助文档:https://gitee.com/help/articles/4191
- 查看 API 列表:https://gitee.com/api/v5/swagger
- 调用 API 时需要在参数中携带 access_token:
get(url, params, headers) {
  return this.service({
    url,
    params: {
      ...params,
      access_token: this.token,
    },
    method: 'get',
    headers,
  });
}
默认 .gitignore 模板
.DS_Store
node_modules
/dist


# local env files
.env.local
.env.*.local

# Log files
npm-debug.log*
yarn-debug.log*
yarn-error.log*
pnpm-debug.log*

# Editor directories and files
.idea
.vscode
*.suo
*.ntvs*
*.njsproj
*.sln
*.sw?
8.4 Node最佳实践
九、脚手架发布模块云构建系统开发
9.1 云构建原理和架构
9.1.1 为什么需要云架构
- 减少发布过程中的重新劳动
- 打包构建
- 上传静态资源服务器
- 上传CDN
- 避免不同环境间造成的差异,保证依赖版本的一致性
- 提升构建性能
- 对构建过程进行统一、集中管控
- 发布前代码统一规则检查,解决大量安全隐患或者性能瓶颈
- 例1:要求接口全部使用 https
- 例2:对于某些落后版本的依赖要求强制更新
- 封网日统一发布卡口
- 发布前代码统一规则检查,解决大量安全隐患或者性能瓶颈
9.1.2 架构设计图
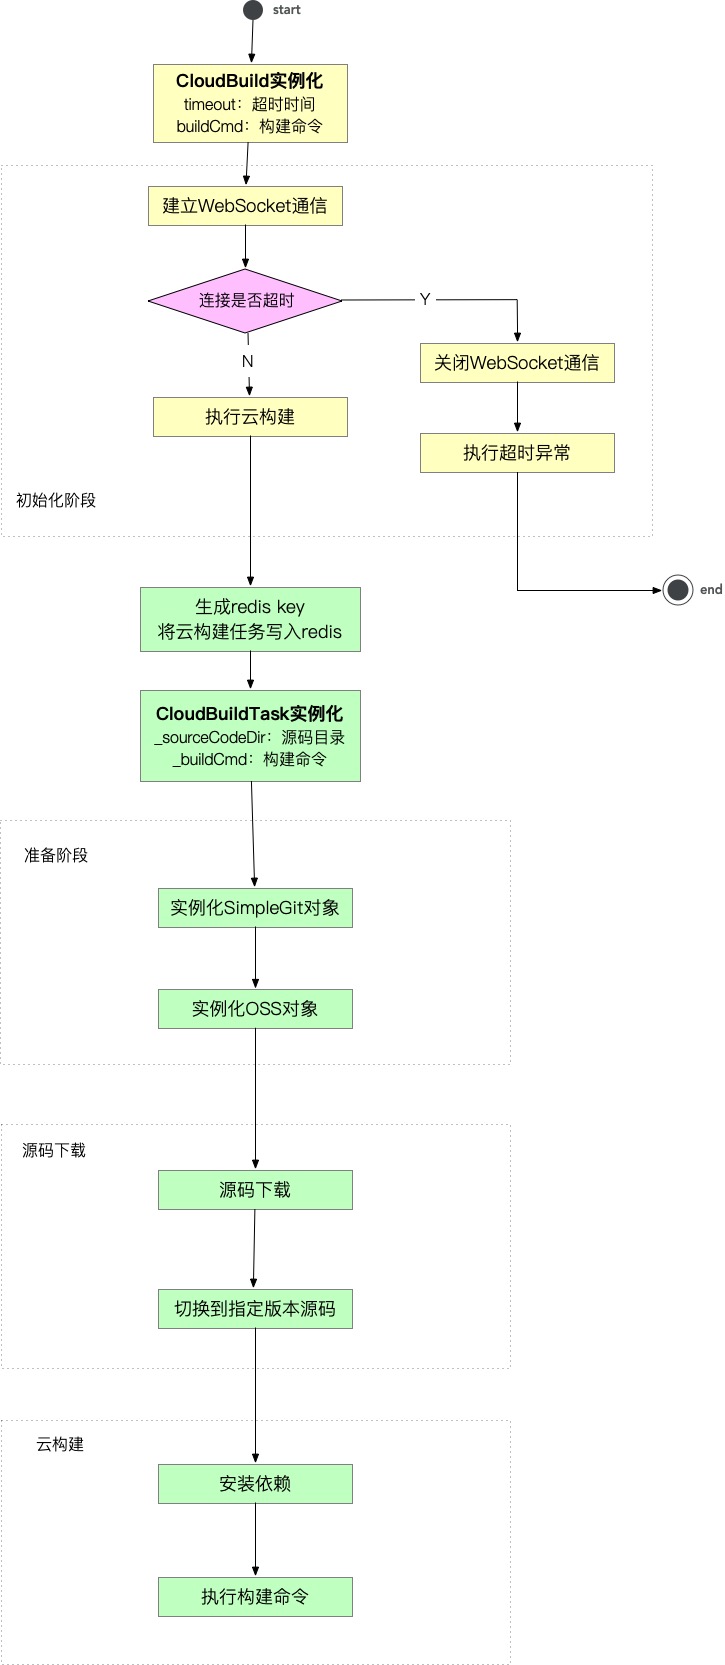
9.2 WebSocket
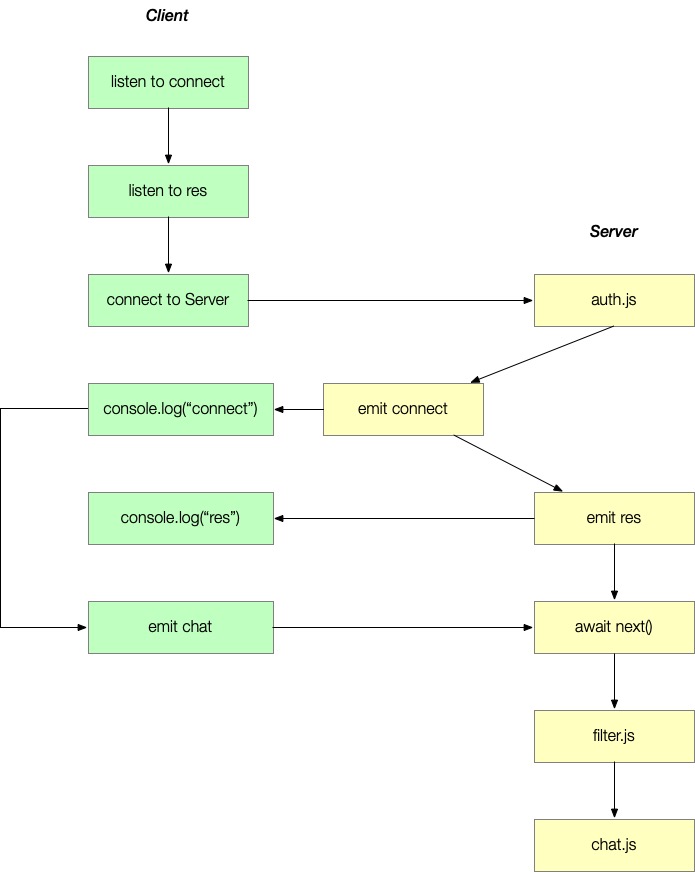
9.2.1 WebSocket 服务开发流程
WebSocket 基本概念:https://www.runoob.com/html/html5-websocket.html
WebSocket 开发流程:https://eggjs.org/zh-cn/tutorials/socketio.html
安装依赖
bashnpm i -S egg-socket.io更新配置文件
js// config.default.js config.io = { namespace: { '/': { connectionMiddleware: ['auth'], packetMiddleware: ['filter'] }, '/chat': { connectionMiddleware: ['auth'], packetMiddleware: [] } } } // plugin.js exports.io = { enable: true, package: 'egg-socket.io' }修改路由配置
js// router.js // app.io.of('/') app.io.route('chat', app.io.controller.chat.index) // app.io.of('/chat') app.io.of('/chat').route('chat', app.io.controller.chat.index)开发middleware
js// app/io/middleware/auth.js 'use strict' module.exports = () => { return async (ctx, next) => { const say = await ctx.service.user.say() ctx.socket.emit('res', 'auth!' + say) await next() console.log('disconnect!') } }开发controller
js// app/io/controller/chat.js 'use strict' module.exports = (app) => { class Controller extends app.Controller { async index() { const message = this.ctx.args[0] console.log('chat :', message + ' : ' + process.pid) const say = await this.ctx.service.user.say() this.ctx.socket.emit('res', say) } } return Controller }
9.2.2 客户端开发流程
// or http://127.0.0.1:7001/chat
const socket = require('socket.io-client')('http://127.0.0.1:7001')

socket.on('connect', () => {
  console.log('connect!')
  socket.emit('chat', 'hello world!')
})

socket.on('res', (msg) => {
  console.log('res from server: %s!', msg)
})
9.3 Redis
什么是 Redis?
Redis 基本概念:https://www.runoob.com/redis/redis-tutorial.html
Redis 安装方法
- Windows & Linux:https://www.runoob.com/redis/redis-install.html
- MacOS:https://www.cnblogs.com/pangkang/p/12612292.html
Redis 开发流程
Redis 开发流程:https://www.npmjs.com/package/egg-redis
9.4 脚手架云构建能力实现
十、脚手架发布模块云发布功能开发
10.1 云发布原理、架构和实现

10.2 OSS 接入指南
// /models/cloudbuild/lib
async prepare() {
  // 判断是否处于正式发布
  if (this.prod) {
    // 1. 获取OSS文件
    const projectName = this.git.name;
    const projectType = this.prod ? 'prod' : 'dev';
    const ossProject = await request({
      url: '/project/oss',
      params: {
        name: projectName,
        type: projectType,
      },
    });
    // 2. 判断当前项目的OSS文件是否存在
    if (ossProject.code === 0 && ossProject.data.length > 0) {
      // 3. 询问用户是否进行覆盖安装
      const cover = (
        await inquirer.prompt({
          type: 'list',
          name: 'cover',
          choices: [
            {
              name: '覆盖发布',
              value: true,
            },
            {
              name: '放弃发布',
              value: false,
            },
          ],
          defaultValue: true,
          message: `OSS已存在 [${projectName}] 项目,是否强行覆盖发布?`,
        })
      ).cover;
      if (!cover) {
        throw new Error('发布终止');
      }
    }
  }
}// pf-scaffold-server/app/controller
async getOSSFile() {
const { ctx } = this;
const dir = ctx.query.name;
const file = ctx.query.file;
let ossProjectType = ctx.query.type;
if (!dir || !file) {
ctx.body = failed('请提供OSS文件名称');
return;
}
if (!ossProjectType) {
ossProjectType = 'prod';
}
let oss;
if (ossProjectType === 'prod') {
oss = new OSS(config.OSS_PROD_BUCKET);
} else {
oss = new OSS(config.OSS_DEV_BUCKET);
}
if (oss) {
const fileList = await oss.list(dir);
const fileName = `${dir}/${file}`;
const finalFile = fileList.find((item) => item.name === fileName);
ctx.body = success('获取项目文件成功', finalFile);
} else {
ctx.body = failed('获取项目文件失败');
}
}// /pf-scaffold-server/app/router.js
'use strict'
/**
* @param {Egg.Application} app - egg application
*/
module.exports = (app) => {
const { router, controller } = app
router.get('/project/template', controller.project.getTemplate)
router.get('/project/oss', controller.project.getOSSProject)
router.get('/page/template', controller.page.getTemplate)
router.get('/section/template', controller.section.getTemplate)
router.get('/oss/get', controller.project.getOSSFile)
}10.3 上线发布流程
// /pf-scaffold/models/git/lib
async publish() {
  let ret = false;
  await this.preparePublish();
  const cloudBuild = new CloudBuild(this, {
    buildCmd: this.buildCmd,
    type: this.gitPublish,
    prod: this.prod,
  });
  await cloudBuild.prepare();
  await cloudBuild.init();
  ret = await cloudBuild.build();
  if (ret) {
    await this.uploadTemplate();
  }
  if (this.prod && ret) {
    // 打tag
    await this.checkTag();
    // 切换分支到master
    await this.checkoutBranch('main');
    // 将开发分支代码合并到main
    await this.mergeBranchToMaster();
    // 将代码推送到远程main
    await this.pushRemoteRepo('main');
    // 删除本地开发分支
    await this.deleteLocalBranch();
    // 删除远程开发分支
    await this.deleteRemoteBranch();
  }
}
十一、脚手架组件发布功能开发
11.1 前端物料体系
- 为什么会形成前端物料体系?
- 由于前端项目规模不断增大,代码中不断出现重复或类似代码,因此需要将这些代码抽象和复用,以提高开发效率。在实践过程中不断出现新的物料类型,单纯组件库已经无法满足代码复用的需求
- 为什么要了解前端物料的概念?
- 在工作中能够更好地以物料的维度去思考项目的复用问题
- 前端物料体系和组件库的关系是什么?
- 组件库是物料体系的一部分,物料体系包括所有可复用的前端代码
- 前端物料包括哪些?
- 组件(基础组件+业务组件)、区块、页面模板、工程模板、JS库、CSS库、代码片段等等……
11.2 前端组件平台架构设计
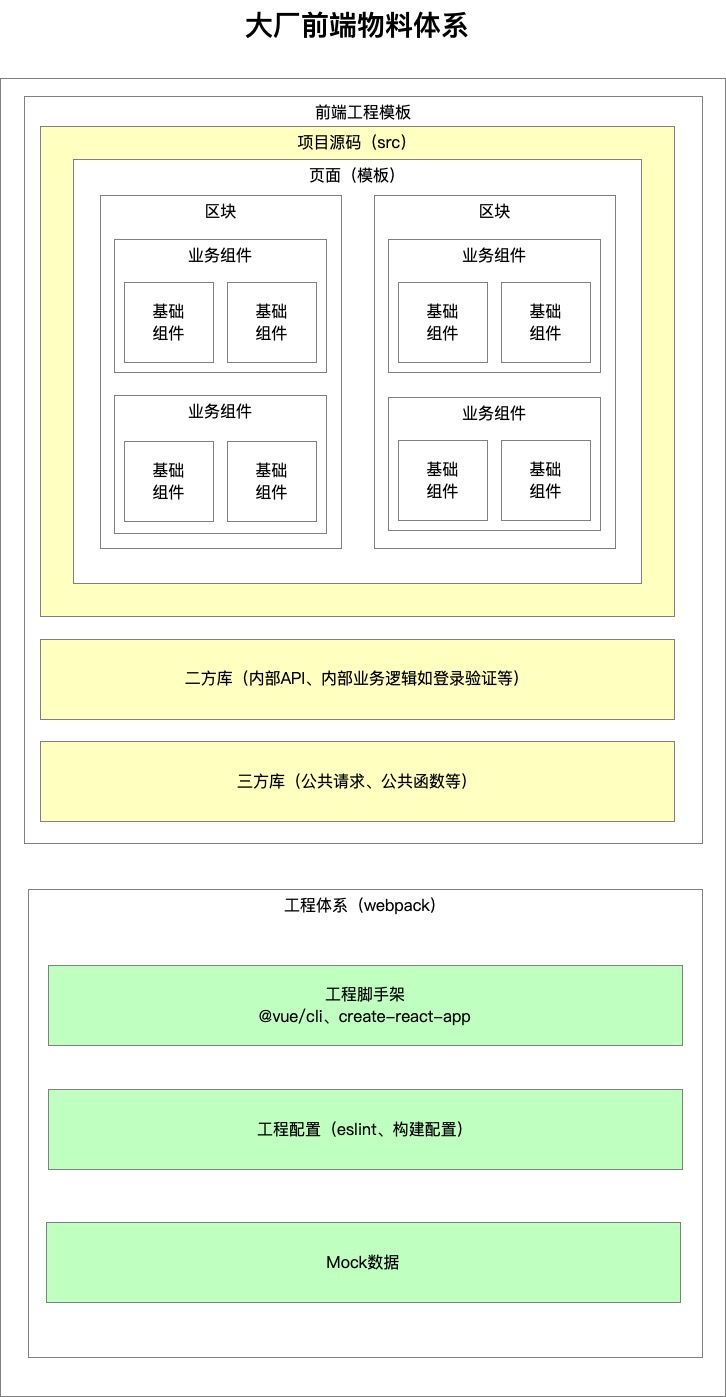
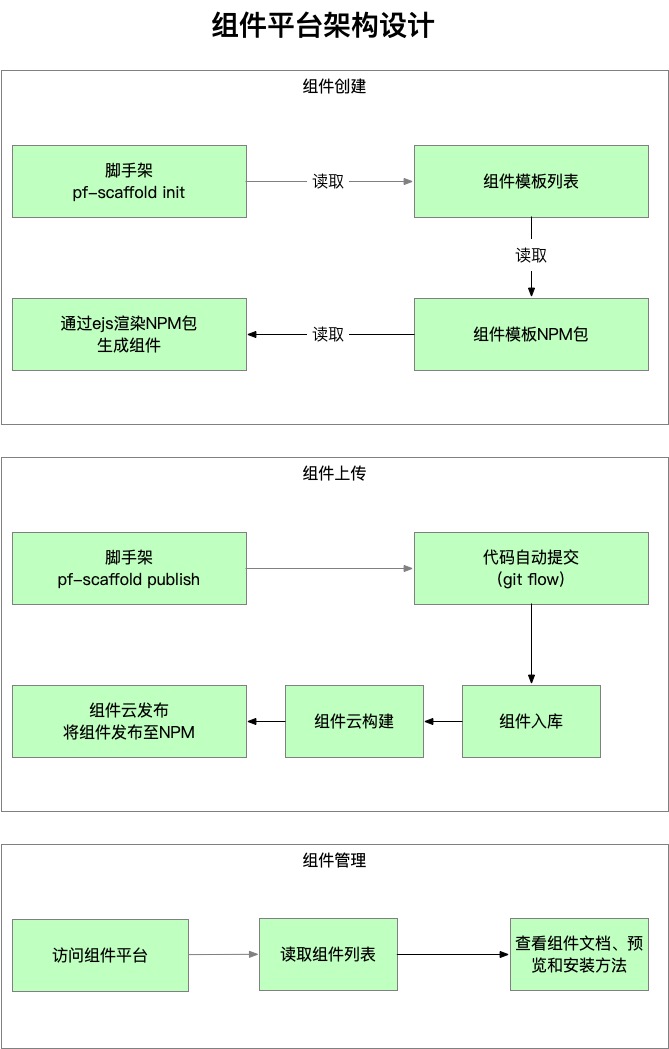
11.3 脚手架组件发布
// /pf-scaffold/models/git/lib/index.js
async publish() {
  let ret = false;
  if (this.isComponent()) {
    log.info('开始发布组件');
    ret = await this.saveComponentToDB();
  } else {
    await this.preparePublish();
    const cloudBuild = new CloudBuild(this, {
      buildCmd: this.buildCmd,
      type: this.gitPublish,
      prod: this.prod,
    });
    await cloudBuild.prepare();
    await cloudBuild.init();
    ret = await cloudBuild.build();
    if (ret) {
      await this.uploadTemplate();
    }
  }
  if (this.prod && ret) {
    // 完成组件上传Npm
    await this.uploadComponentToNpm();
    // 打tag
    await this.checkTag();
    // 切换分支到master
    await this.checkoutBranch('main');
    // 将开发分支代码合并到main
    await this.mergeBranchToMaster();
    // 将代码推送到远程main
    await this.pushRemoteRepo('main');
    // 删除本地开发分支
    await this.deleteLocalBranch();
    // 删除远程开发分支
    await this.deleteRemoteBranch();
  }
}

// /pf-scaffold/models/git/lib/ComponentRequest.js
const axios = require('axios');
const log = require('@pf-scaffold/log');

module.exports = {
  createComponent: async function (component) {
    try {
      const response = await axios.post(
        'http://localhost:7001/api/v1/components',
        component
      );
      log.verbose('response', response);
      const { data } = response;
      if (data.code === 0) {
        return data.data;
      }
      return null;
    } catch (e) {
      throw e;
    }
  },
};